
How to use OBS: Step-by-step guide
TL;DR
OBS Studio may seem overwhelming at first. However, if you learn to use it step by step, you will quickly discover how simple and incredibly useful it is. OBS is super easy to install and tune, as it has the Auto-Configuration feature to help you get started in a matter of seconds. The streaming software has lots of built-in tools to easily manage your audio and video sources — all to make your streaming experience nice and smooth.
With OBS, you can live stream directly to one streaming platform or use Restream to broadcast to multiple platforms simultaneously. The software also allows you to record your live streams — or any video and audio source, for that matter. And OBS is completely free to use.
Step 1: How to install OBS Studio
The first thing you have to do is install OBS Studio on your device. Go to the official OBS Studio website and select your platform: Windows, MacOS or Linux. Then, open the downloaded file and begin the installation.
You will have an opportunity to include several additional plugins for OBS during the setup. We recommend leaving these boxes blank for now. After the installation is completed, you can launch OBS Studio either directly from the installation window or later via a new icon on your desktop.
Step 2: How to set up OBS Studio
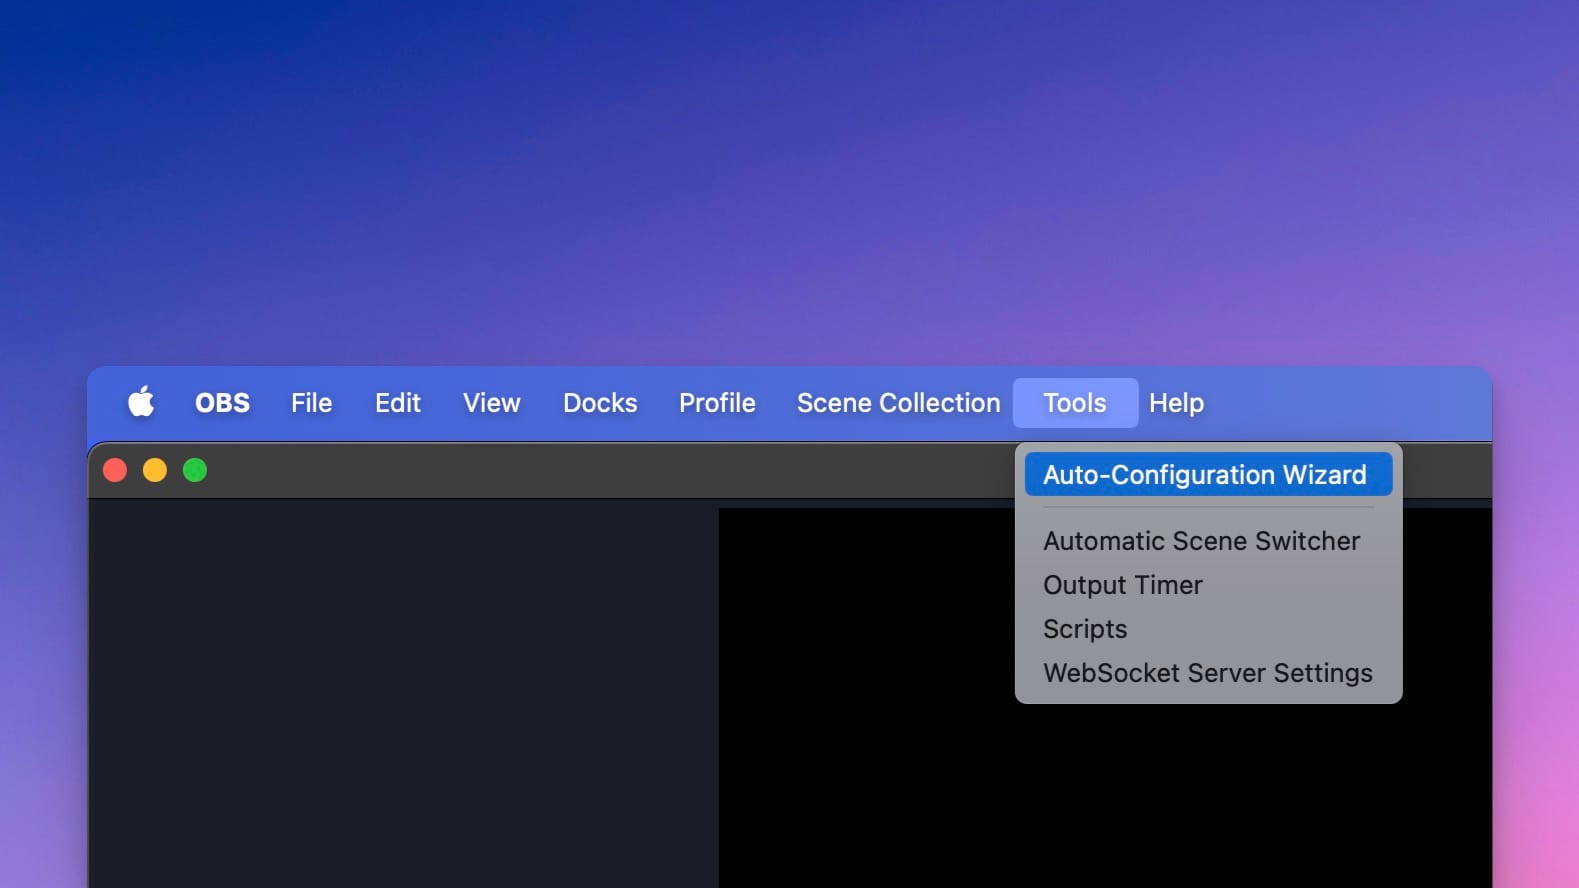
When you launch OBS Studio for the first time, you will encounter the Auto-Configuration Wizard. This automated tool tests your system and applies the most optimal settings specifically for your device. The Auto-Configuration Wizard is the best option if you want to start streaming as quickly as possible.
If you want to run it again later, you can access it in the Tools menu at the top menu bar at any time to perform the automatic configuration. And if you aren’t happy with the result, you can always modify the settings yourself later.
Step 3: How to create a scene in OBS Studio
A scene is a combination of your video and audio layers (sources) captured by OBS. Each of these layers has one specific input. For instance, say you want to create a live stream with a video input from your webcam, an audio input from your microphone and a video input from your device’s screen. By adding these three layers to the sources for your scene, OBS combines and streams them altogether.
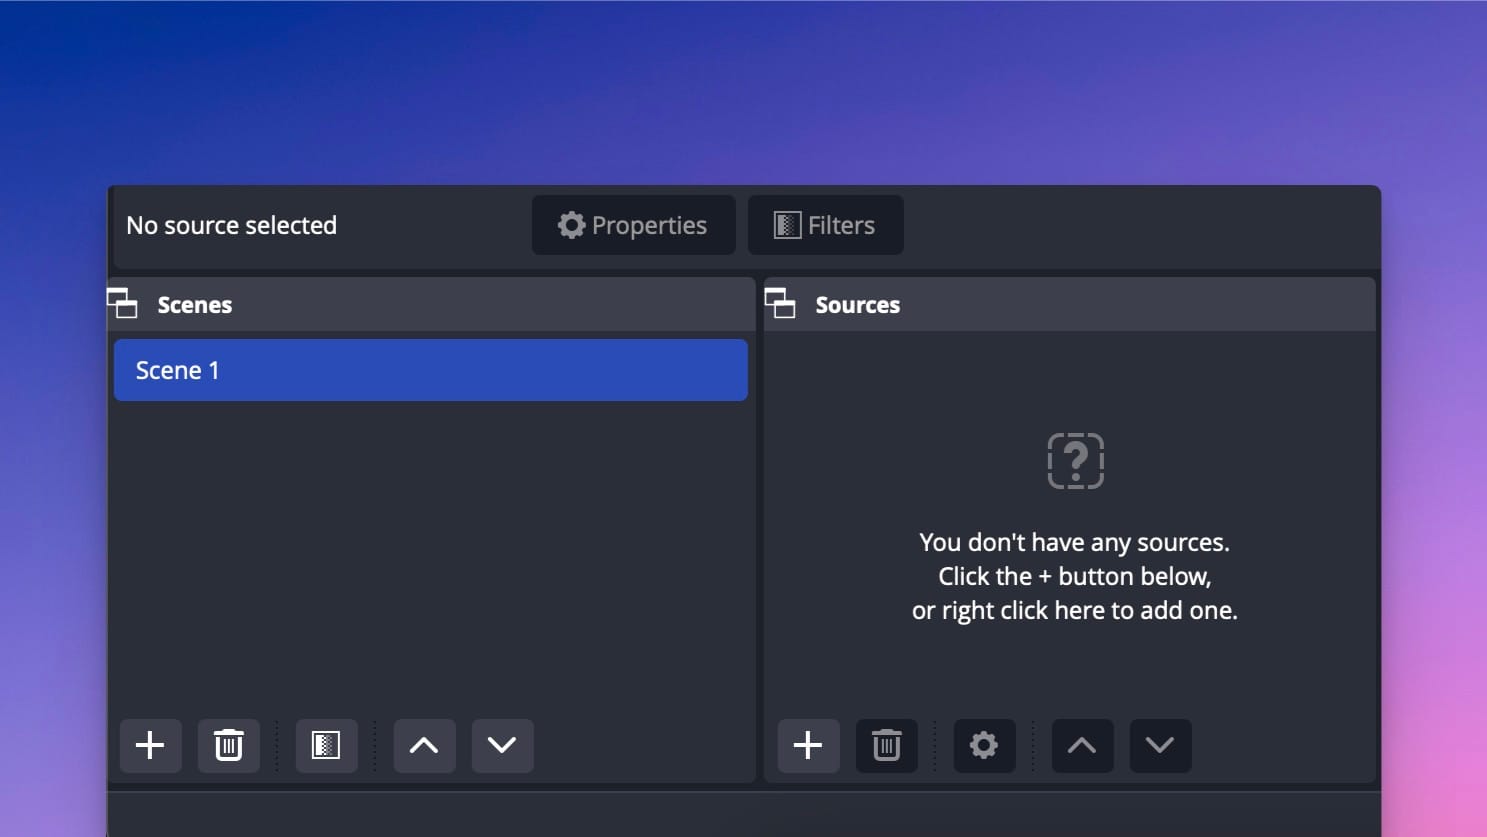
The very first time you run OBS, you will notice one empty Scene in the Scenes dock at the bottom left. You can delete it, rename it or add a new one. Keep in mind, only one selected scene will be streamed. This gives you the option of switching the scenes during the stream to show different stream appearances.
Step 4: How to add audio and video sources in OBS
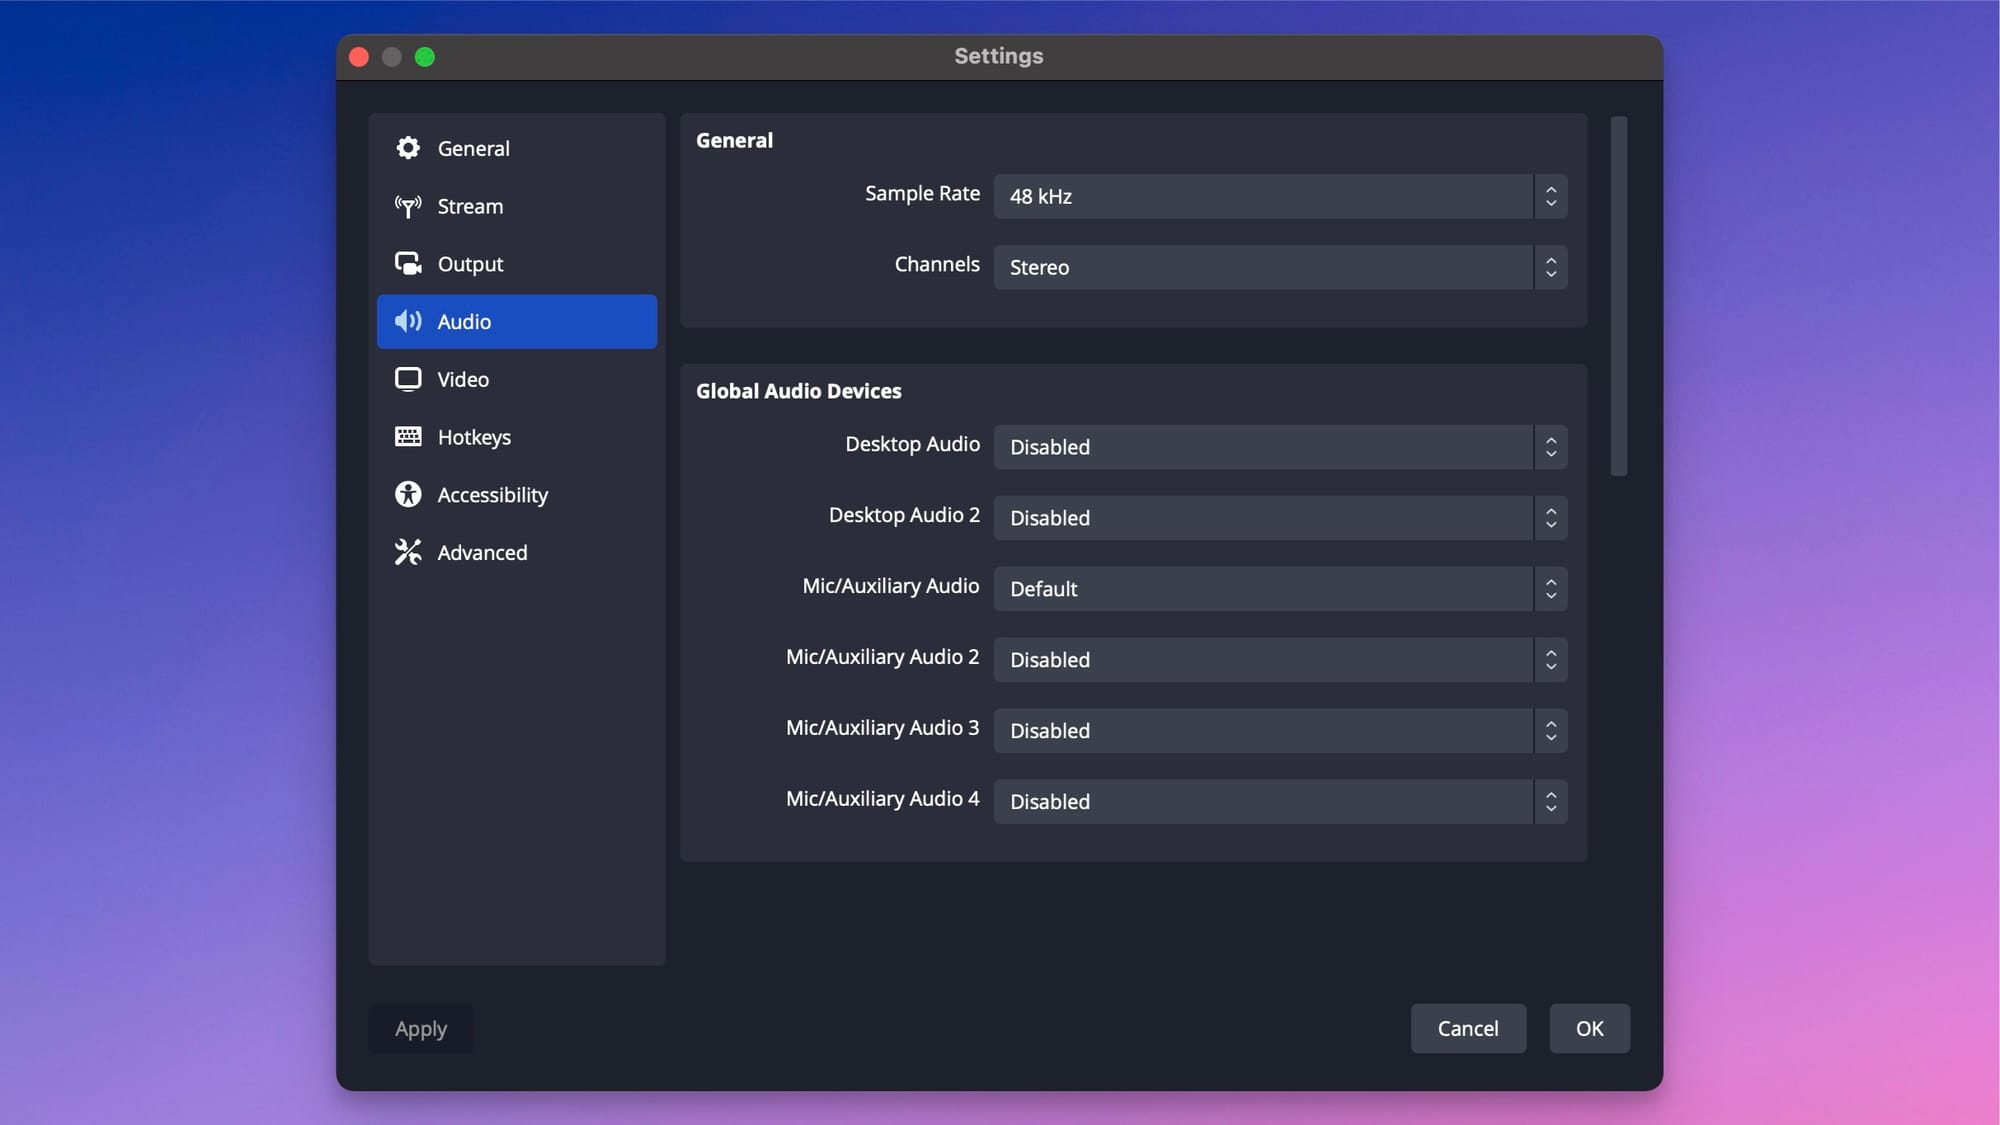
Typically, OBS Studio uses your default input and output audio sources. You can check the audio levels in the Audio Mixer section next to the Sources dock and see if they are active when you speak or play any sound on your device. You can click Settings and go to the Audio tab to select your audio sources manually.
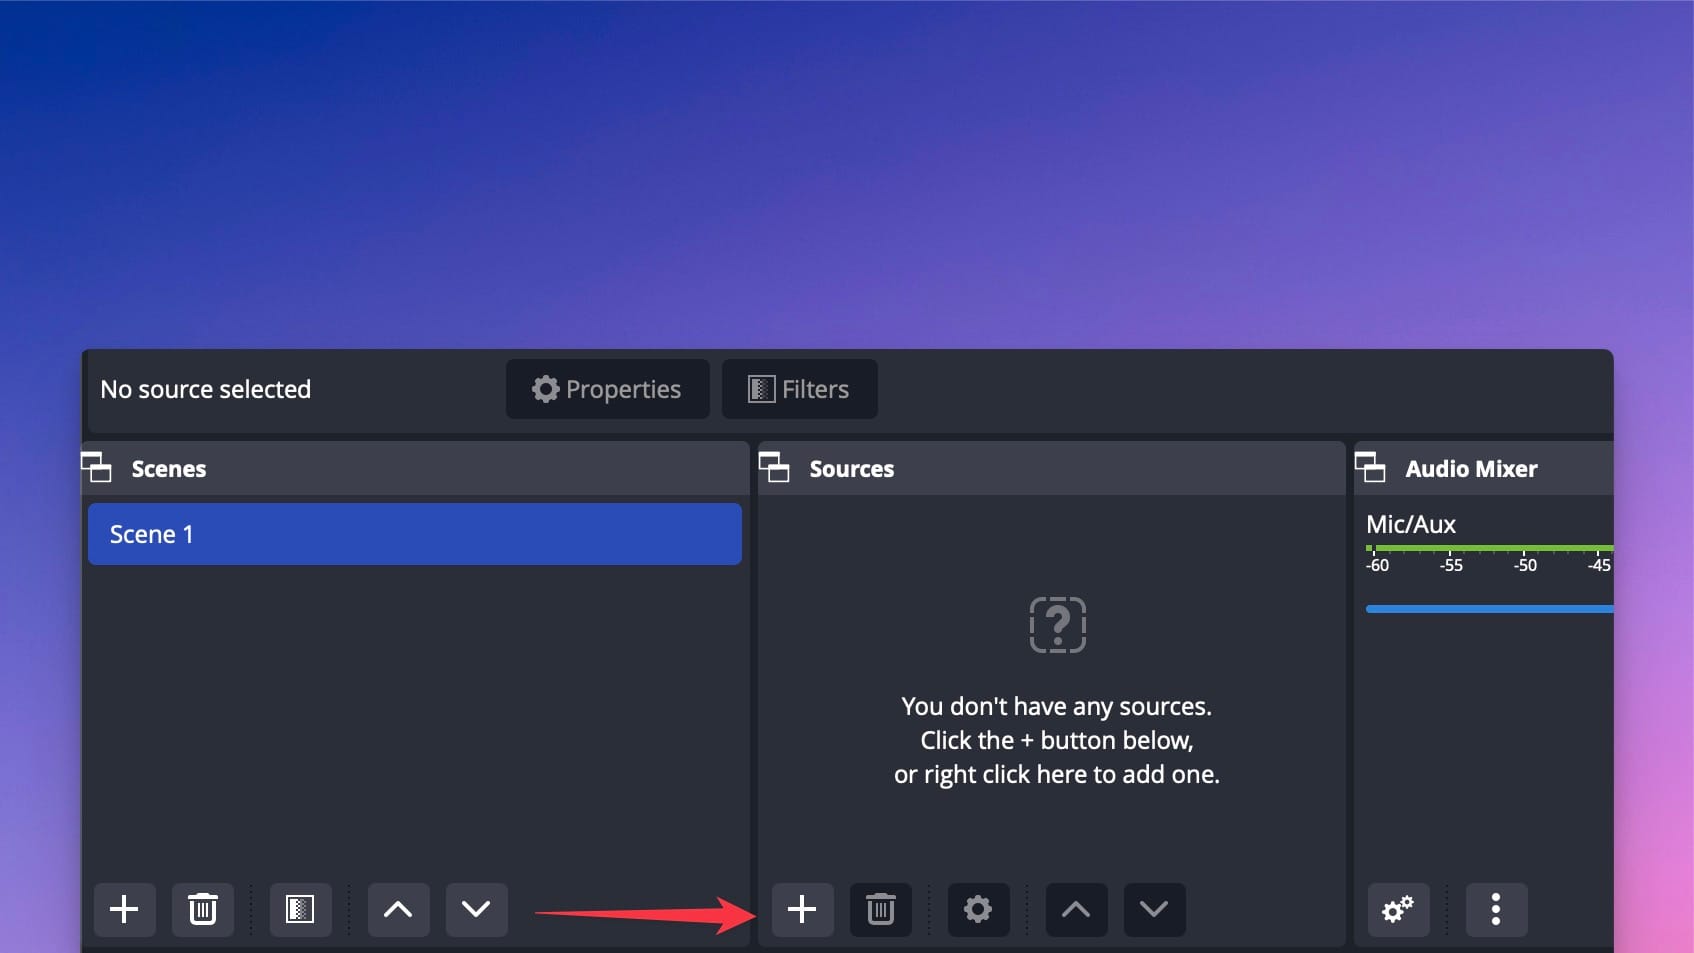
Adding video sources is a bit different. You’ll notice that the video preview is black, meaning OBS doesn’t have a connected video source yet. To change that, you should add a video source in Sources next to the Scenes dock. Simply right-click inside the box and add a new video source.
Here are some examples of video sources you can add to OBS:
- The Game Capture feature allows you to capture the specific game you are playing (and also sometimes can be useful for capturing windows that can’t be captured by the window capture option). Game Capture is only recommended for Windows. Other operating systems should use Display, Window or macOS Screen Capture sources.
- The Window Capture feature works for most non-game applications.
- The Video Capture Device will add your webcam or capture card as a video source.
- The Browser source allows you to add your browser as a source and live stream anything from your browser directly through OBS.
- The Display Capture is used to add your monitor as a source and capture your entire work screen. You can choose the display to capture and enable or disable the visibility of your cursor.
- The Image source allows you to add various image types to your scene. Practically any image format is supported, so you don’t have to worry about that.
- With the Media source it’s possible to add all sorts of different media types directly to your stream. The currently supported file types are:
- Video: .mp4, .ts, .mov, .flv, .mkv, .avi, .gif, .webm
- Audio: .mp3, .aac, .ogg, .wav
- Finally, the Text source allows you to add simple text renders to your stream layout. Most default editing settings are available.
Step 5: How to manage layers in OBS
The layers system comes in handy when you want OBS to capture multiple video sources on your stream. Each of your added video sources lies on a different layer, which allows you to create combinations of output pictures and manage them just the way you want. The highest video source on your Sources list will be displayed on top of all the others.
For example, if you want to stream a game with your webcam on, you should place your Video Capture Device source first on the list, followed by the Game Capture of your game. You can check whether everything is layered correctly in the preview window. And if something doesn’t work, you can rearrange the layers by simply dragging and dropping them inside the Sources dock.
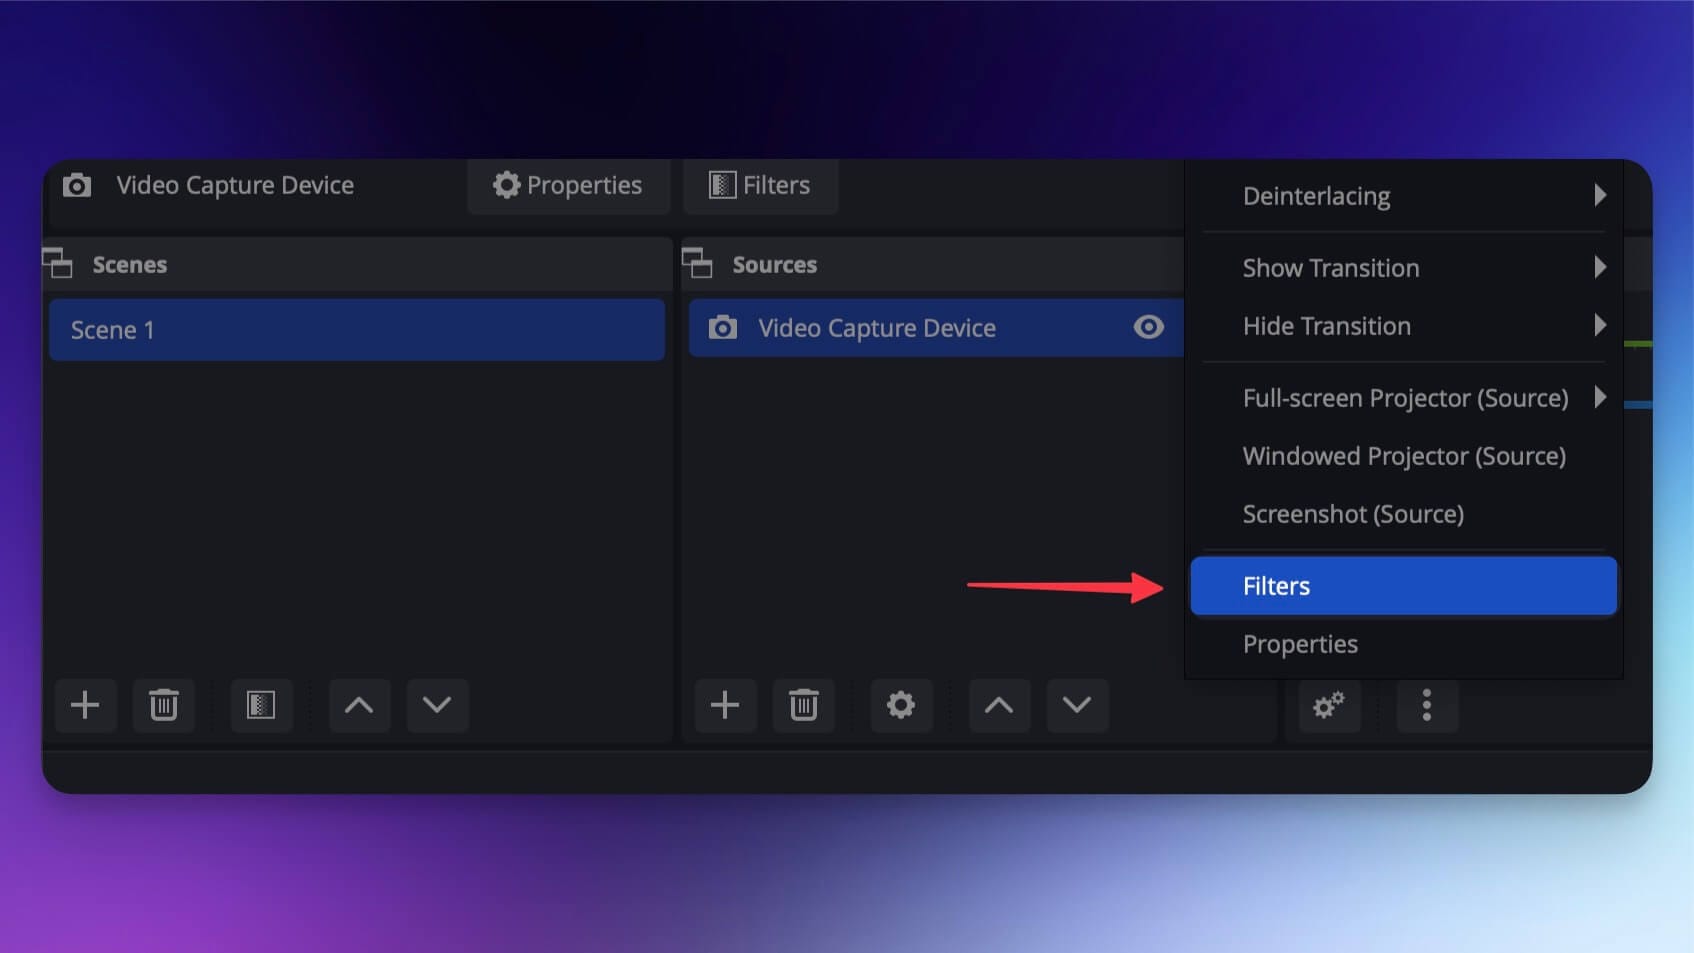
Step 6: How to add filters for visual and audio effects in OBS
After you’re done managing your audio and video layers, you can add special filters and effects to the sources. Simply right click on the source and choose Filters. For the audio sources, you can apply compression, increase or reduce gain, add a noise gate, suppression, your own VST plugins and much more.
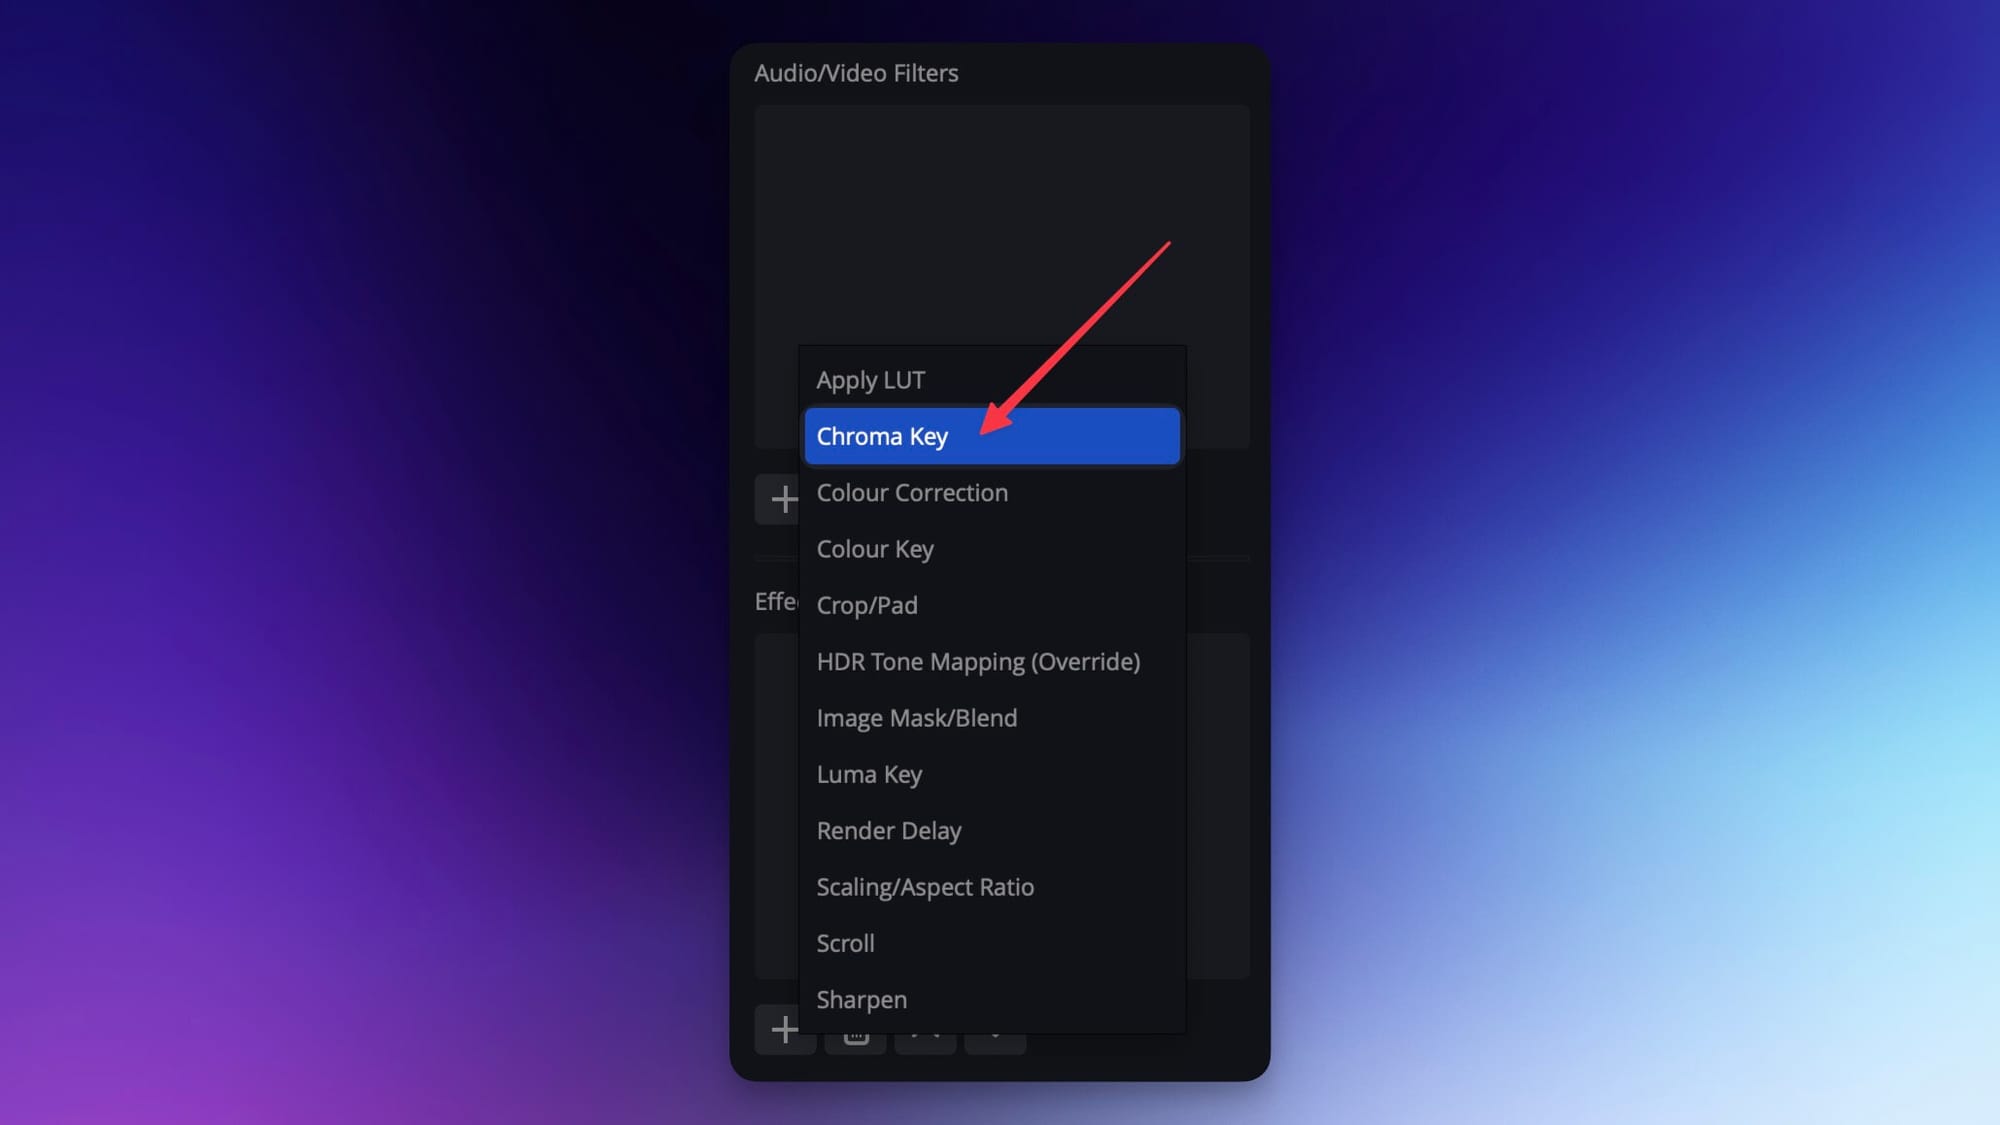
For video outputs, you can apply Chroma Key, change the Scaling/Aspect Ratio, edit the size of the picture with the Crop filter and more. There’s plenty of custom plugins you can use in OBS to add even more filter options for both audio and video.
If you want to change the size and placing of your video source in the preview, simply click on the source you want to work with and drag any red square to increase or reduce the size of the picture. While dragging use Ctrl, Alt, Shift (or mac alternatives) to scale or crop while preserving original aspect ratio.
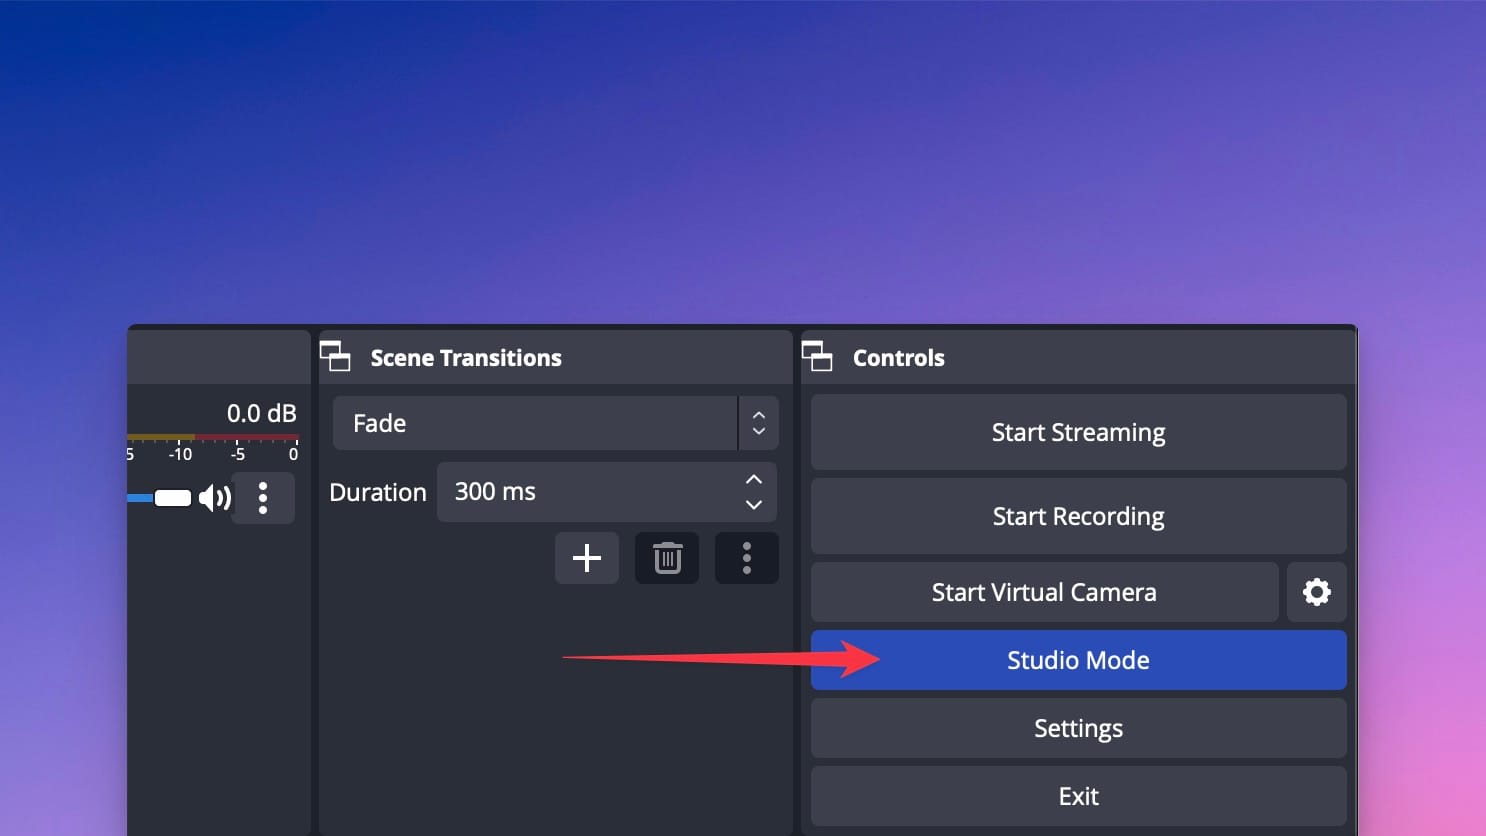
Step 7: How to use OBS Studio Mode
OBS has a powerful feature called Studio Mode that allows you to modify your scenes while you’re live, without your viewers being able to see your changes. To access this feature, simply click on the Studio Mode button in the Controls Dock, right above the Settings button. You will see your preview screen is now split into two screens.
- The right one is your actual Live view, meaning your audience will see exactly what’s on this screen.
- The left screen is where you can edit your scenes. You can change any element in your selected scene while live streaming, choose the transition style and switch between your scenes at any given moment.
Step 8: How to start your live stream in OBS Studio
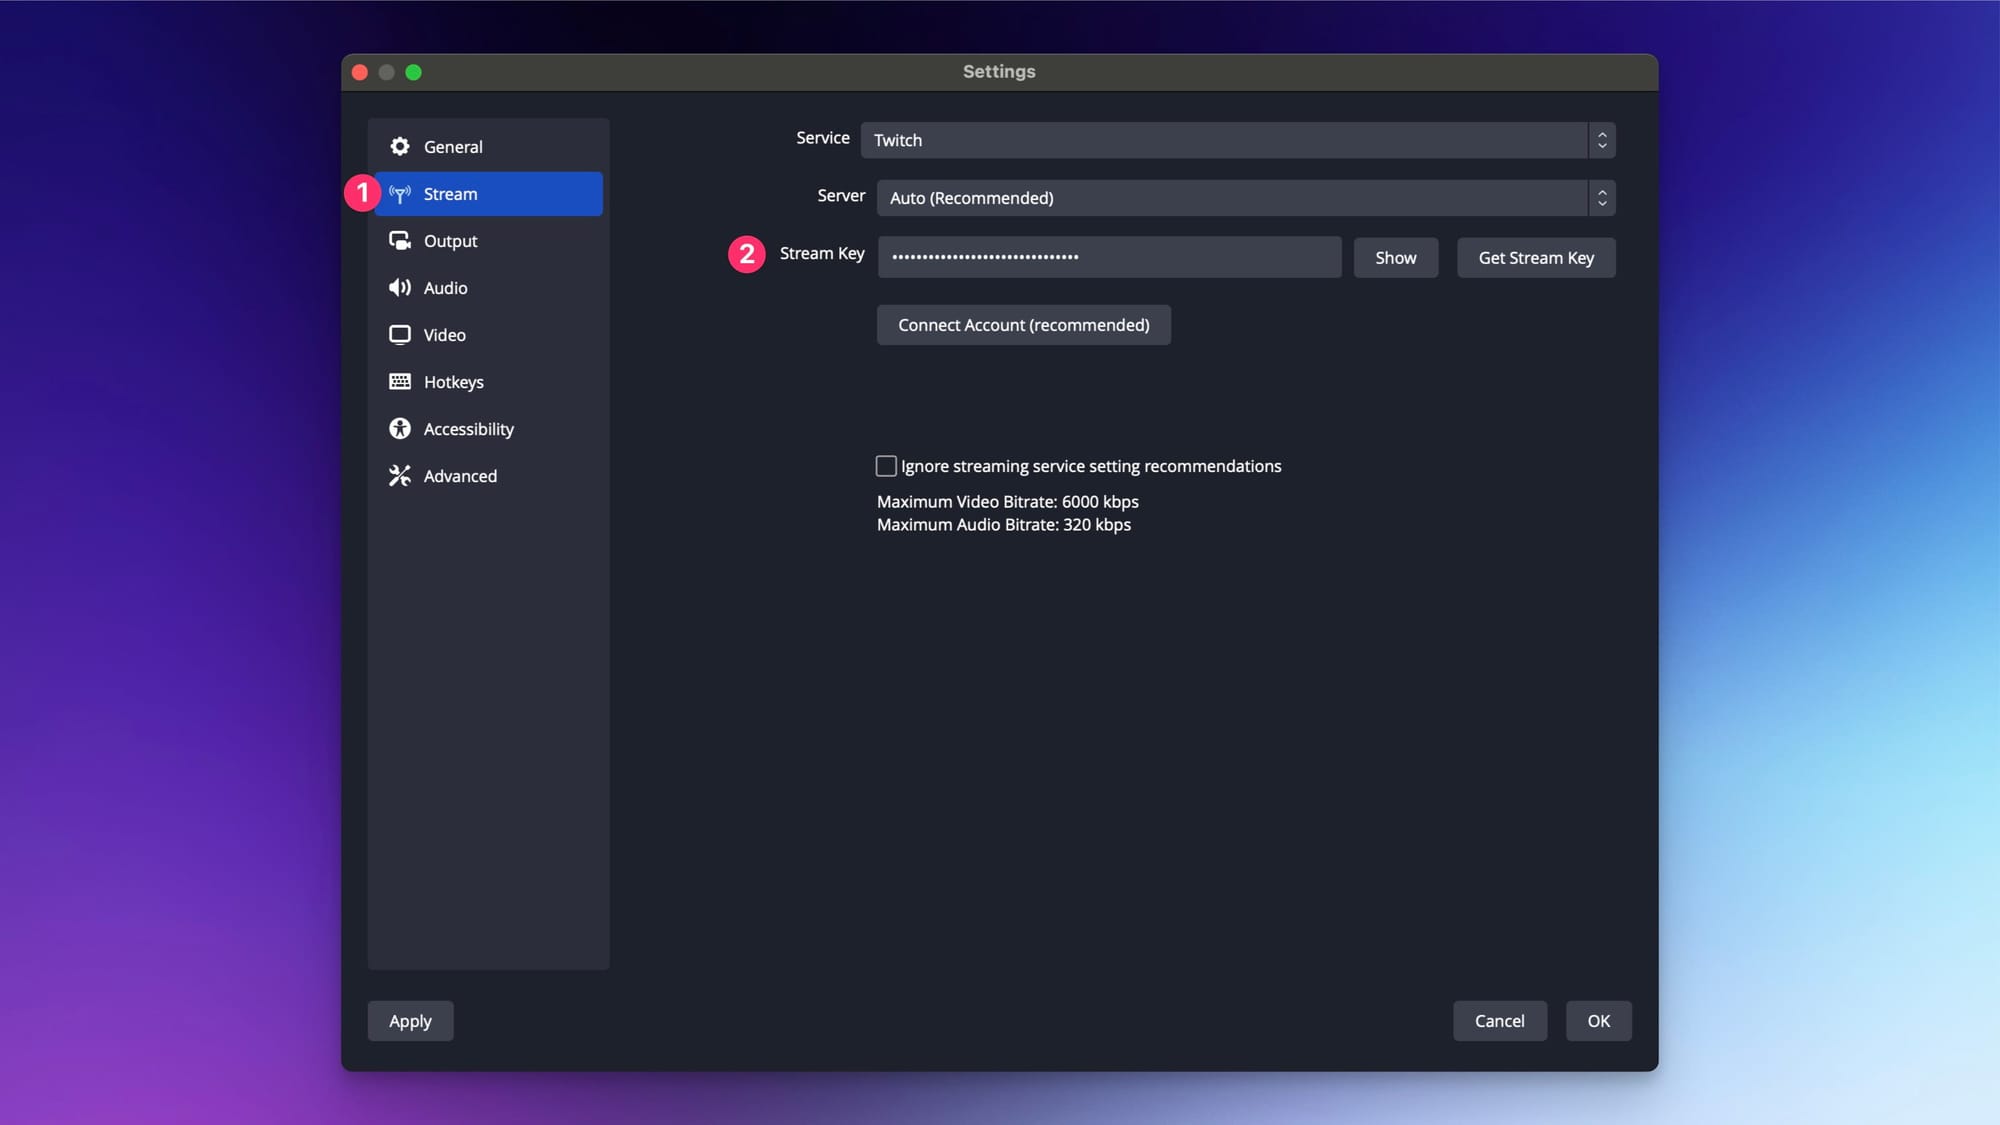
With OBS Studio, you can broadcast directly to one streaming platform. For instance, if you want to live stream to Twitch, go to Settings and click on the Stream tab. Choose Twitch in the Service drop-down list and paste your Stream Key. Apply the changes and click OK. Now all that’s left to do is to click the Start Streaming button on the bottom right.
Understanding OBS stream key
In short, a stream key is a special code that allows OBS to communicate with a streaming platform and send your video content to be live streamed.
Each streaming platform has its own unique stream key, so in order to link OBS with your preferred platform, you need to find this key in your account settings.
If you don’t know where to find your Stream Key, read our guides on how to find your stream key on all major streaming platforms:
However, there’s a much easier way of getting the stream key for most major platforms. Let’s take a closer look at the following short instruction:
- Open your OBS Studio and click Settings on the bottom-right.
- Select the Stream tab on the left.
- Choose your preferred streaming platform in the Service box.
- Click Connect Account and follow the instructions to link OBS with the platform. After you complete the connection, you are all set to live stream right away!
That’s it! You’re ready to stream using OBS Studio. For more info on how to stream on specific platforms with OBS, you can read our detailed guides:
- How to stream on Twitch with OBS.
- How to stream on TikTok with OBS.
- How to stream on YouTube with OBS.
Unfortunately, OBS Studio doesn’t allow you to live stream to multiple services. However, what it can do is broadcast your content directly to Restream. Instead of choosing a platform in your Stream Settings, you select Restream in the service list. Your broadcast will be sent to Restream, where it can be shared on multiple platforms at the same time, including YouTube, Facebook, Twitch, X (Twitter), Kick, LinkedIn, TikTok and many more.
Step 9: How to record your videos with OBS
OBS allows you not only to live stream, but also to record your video content. Right below the Start Streaming button, you can find the Start Recording button. When you select it, OBS will immediately start recording your session. Simply click the button again to stop recording. By default, OBS recordings go to the Video folder in your main documents. However, you can easily change the path and adjust the quality in the Output tab in your OBS settings.
Note that you can record with the original stream quality or higher/lower by using additional resources of your computer. Recordings support up to six audio tracks for later edits. The recommended recording format is MKV because it allows six tracks and will not break if OBS crashes for some reason.