Are you a live-streaming novice whose videos always look just a little…dull? You probably need better lighting. In our full video lighting guide, you’ll learn everything you need to know about lighting for video production, including how to pick the best lights, essential tips, equipment, and more!
But first, why is lighting so important?
Lighting makes or breaks your video
Cameras don’t capture light the way human eyes do. Your set needs a lot of lighting if you want the image that appears on screen to seem natural. But you can’t just grab all the lamps you have at home and shine them on your subject. More lighting is good, but not if you set it up wrong.
If your lighting is off, it takes away from the most important part of your video — your message. Bad lighting is distracting, and nobody will listen to what you’re saying. Or worse, they’ll stop watching.
It’s simple — a good video needs good lighting.
How do you choose light for videos?
Choosing your lights for video production gets easier the more you do it. You can experiment with what works and what doesn’t, until you find the perfect lighting for your style.
When choosing your lighting, consider the following four factors:
1. Light source
Check out the lighting available in your shoot location. Natural lighting can be the best light source or it can be your worst enemy. You can’t get consistent lighting if the weather changes, and direct sunlight can be too extreme sometimes.
Also, try to stay away from overhead lighting. It throws ugly shadows on your subject. And keep in mind that large light sources are always softer than small ones.
2. Color temperature
Based on the type of bulb, a light can appear “warmer” or “cooler.” Warm lights are yellow, and cool lights are white or light blue.
You measure color temperature in kelvins. A higher number means colder lighting, a lower number is warmer. For reference, candlelight (the warmest) is 1000K and a blue sky in daytime (the coldest) is 10,000K. Whatever color temperature you choose for your shot, make sure it’s consistent across all light sources. Mixing color temperatures produces a poor-quality video.
3. Intensity
Intensity refers to the softness and hardness of lighting. Hard lighting is brighter, but it can be too intense — like taking a photo under the full sun at noon. If you want bright lighting but need to soften it, you can put a diffuser in front of your light.
4. Physical specifications
How tall is your light stand? Are your lights easy to carry around? Your equipment needs to work for your shoot, no matter how high-quality the bulbs are. You should be able to control the beam’s width and the light stand’s height. Don’t overlook the importance of mounting accessories, reflectors, and diffusers either.
Types of artificial light for shooting videos
Key light
The key light is your main light. It’s usually the brightest, most powerful light source for your shot. A powerful LED key light with a big diffuser works well for videos and live streams. LED lights tend to be pricey, however, so if it’s not in your budget, you can explore other key light options. You’ll also need a stand to put your key light on as well as a diffuser.
Fill light
Fill lights “fill in” any areas the key light doesn’t cover. Even a powerful light will still leave behind some shadows, and a fill light will make those dark spots disappear. Umbrellas and softboxes are both good types of fill lights. Using an umbrella is more straightforward than a softbox, but softboxes are more versatile. You’ll have to play around with your lighting setup when using a softbox, whereas an umbrella you just set up and go.
Back light
A well-placed back light improves your video quality immensely. It shines on your subject from behind, eliminating any shadows that remain from your key and fill lights. You have a few options for back light placement. You can either stand it up as close to directly behind the subject as possible or hang it from above the subject. You could also place it off to the side. The back light should be as powerful as or less powerful than your fill light.
Ring light
If you only want one light, then get a ring light. It’s a powerful light shaped like a ring and lights up everything in front of it evenly. Many beginning YouTubers use ring lights because they’re easy to set up and don’t require any other lights to make the set look good. They make the subject’s face look bright, but they can be harsh to look directly into. Most people choose LED bulbs over fluorescent because they last longer. For videos where shadows aren’t an option, like makeup tutorials, ring lights make the perfect lighting.
Lighting schemes for indoor video production
As you may have guessed, there’s more than one way to do lighting for video — especially with multiple lights. Three-point lighting is popular, but you can use two lights, four lights, or loop lighting as well.
Three-point lighting
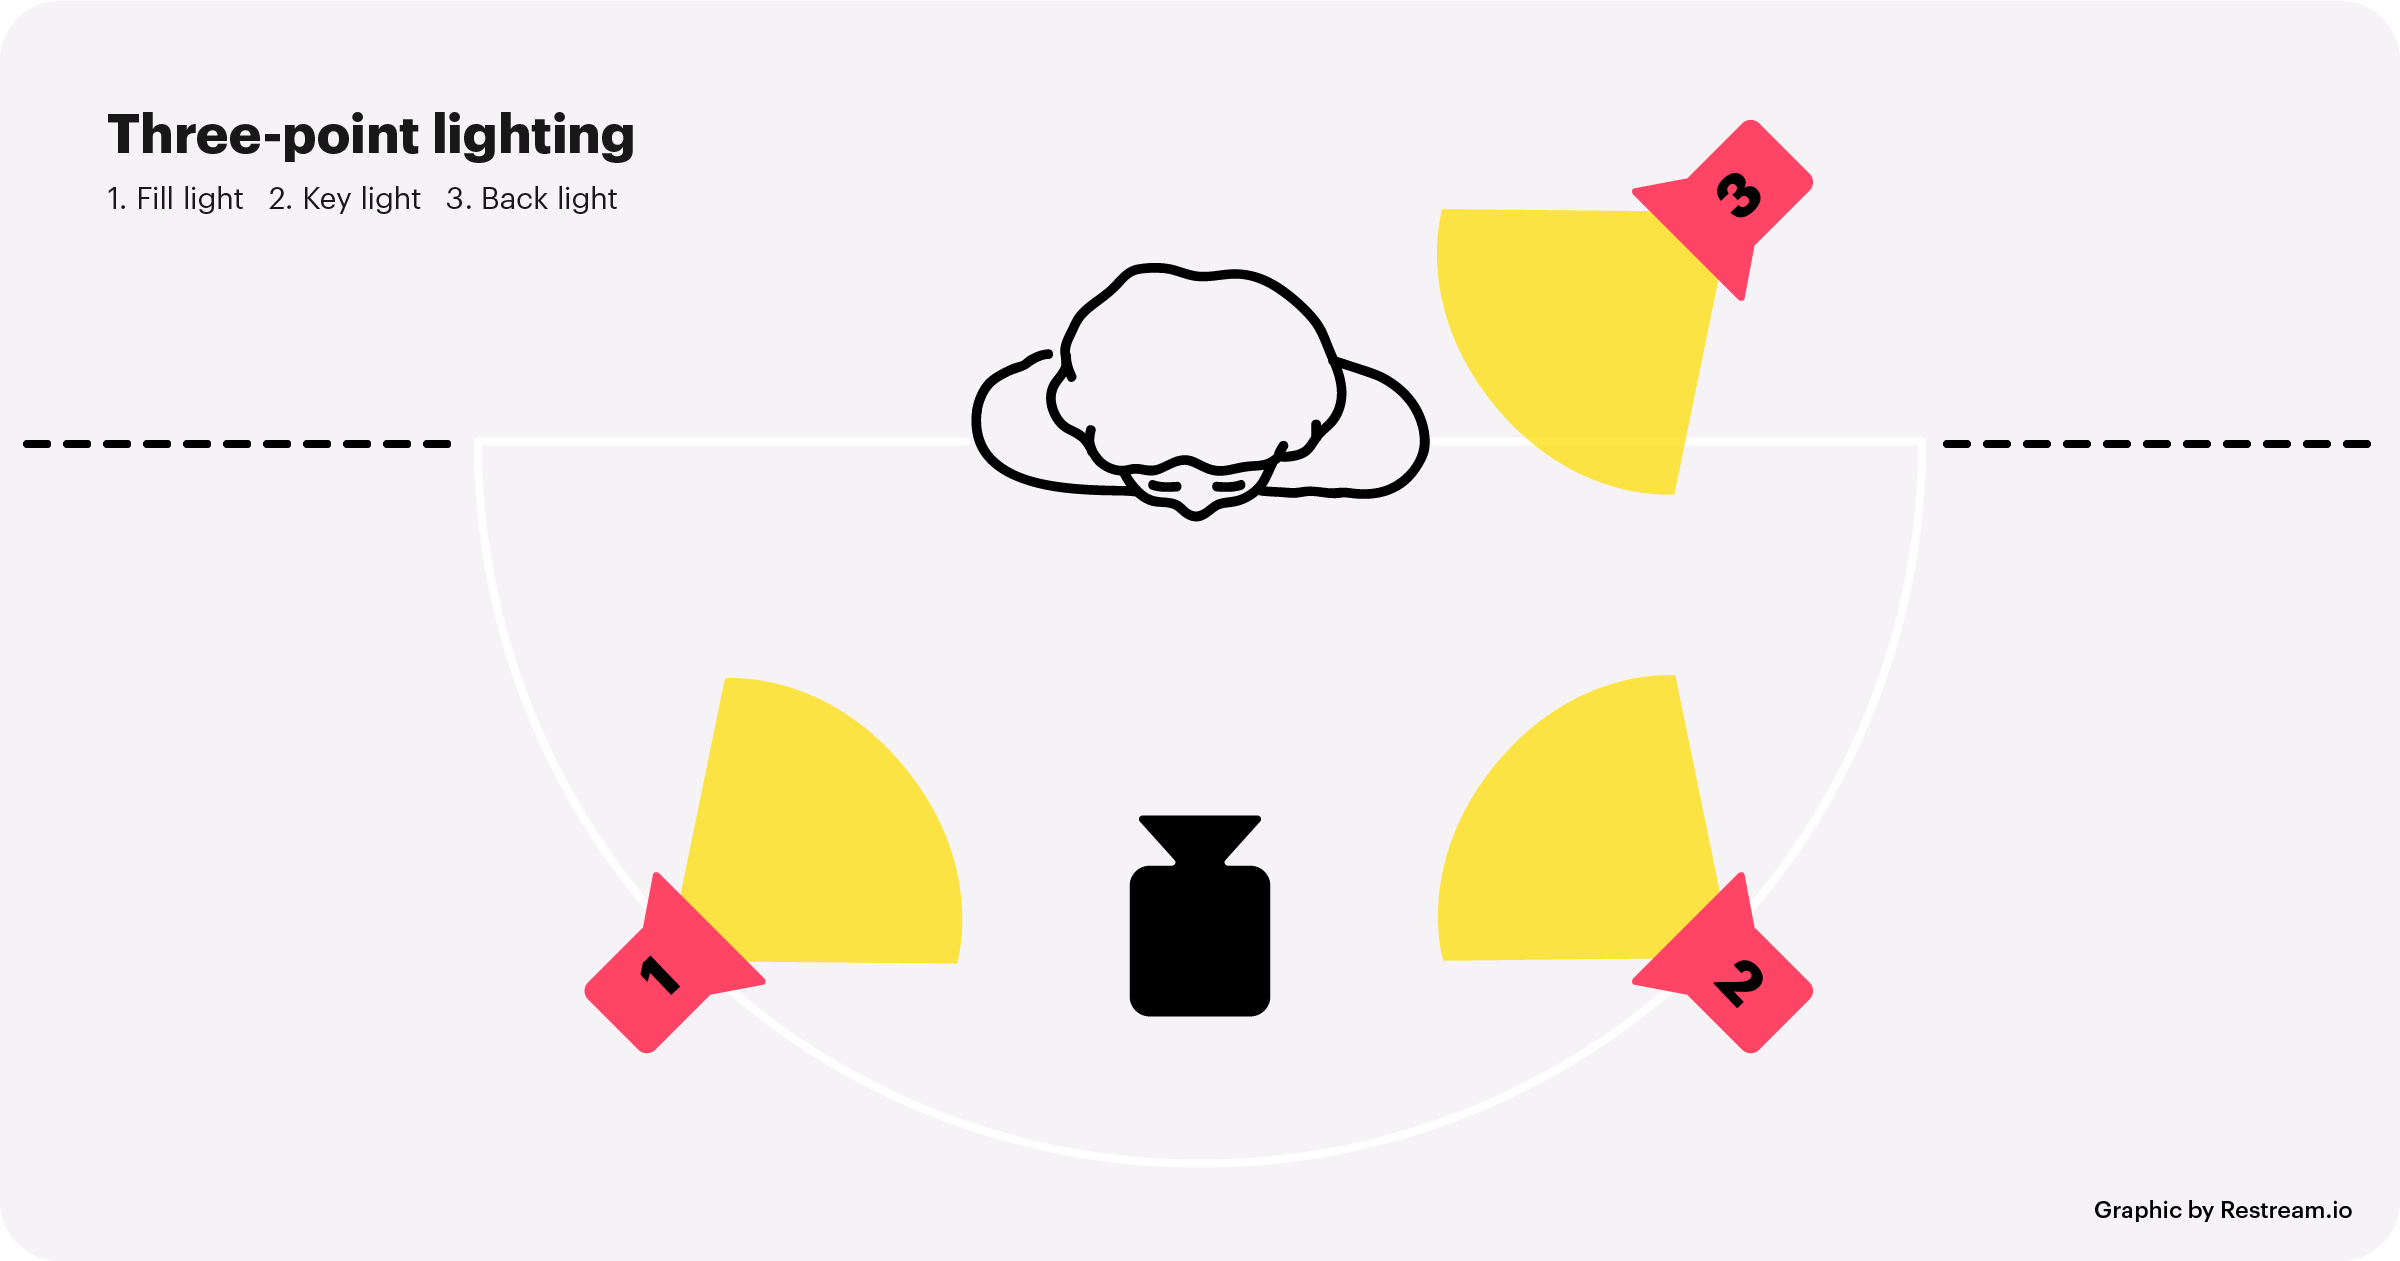
A three-point lighting setup uses three main lights — key light, fill light, and back light. This scheme is the most common for YouTubers and streamers because it’s perfect for one person speaking into the camera. Adjust this basic setup by adding a diffuser to the back light, to soften it and make it look more natural.
Two lights
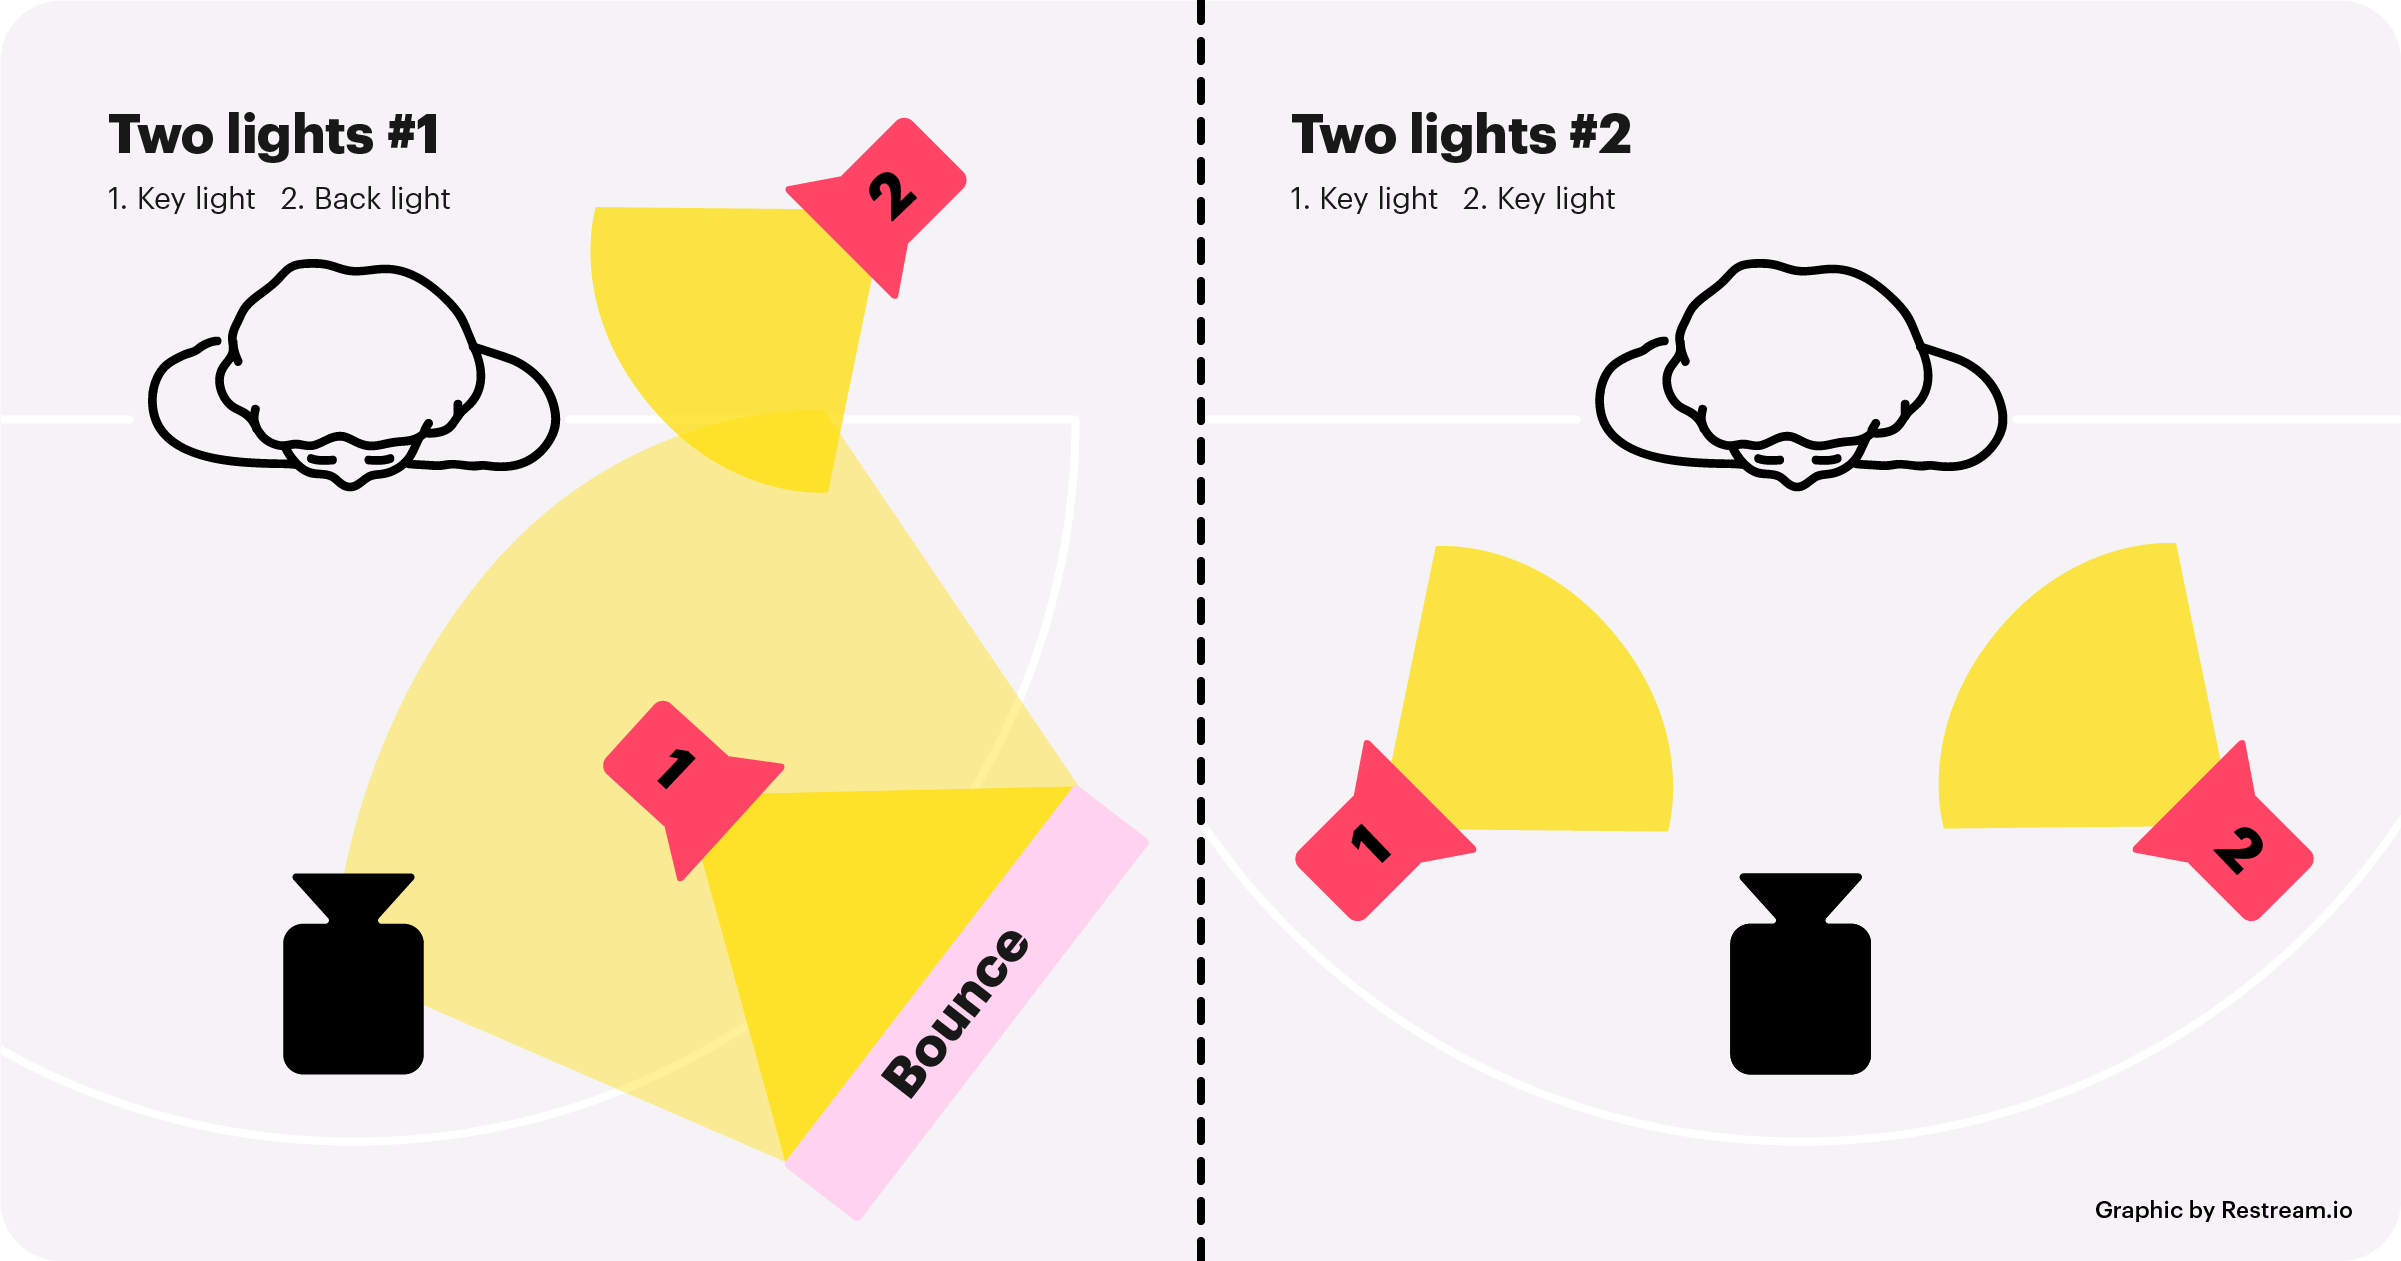
If you only have two lights, you can use a bounce card instead of a fill light. This type of reflector will shoot the light from your key light onto your subject’s face. If you have a window and some nice daylight handy, you could also substitute the window for a fill light. You can also place two lights on either side of your set, at eye level, to cast an even light over you as you get up and move around.
Four lights
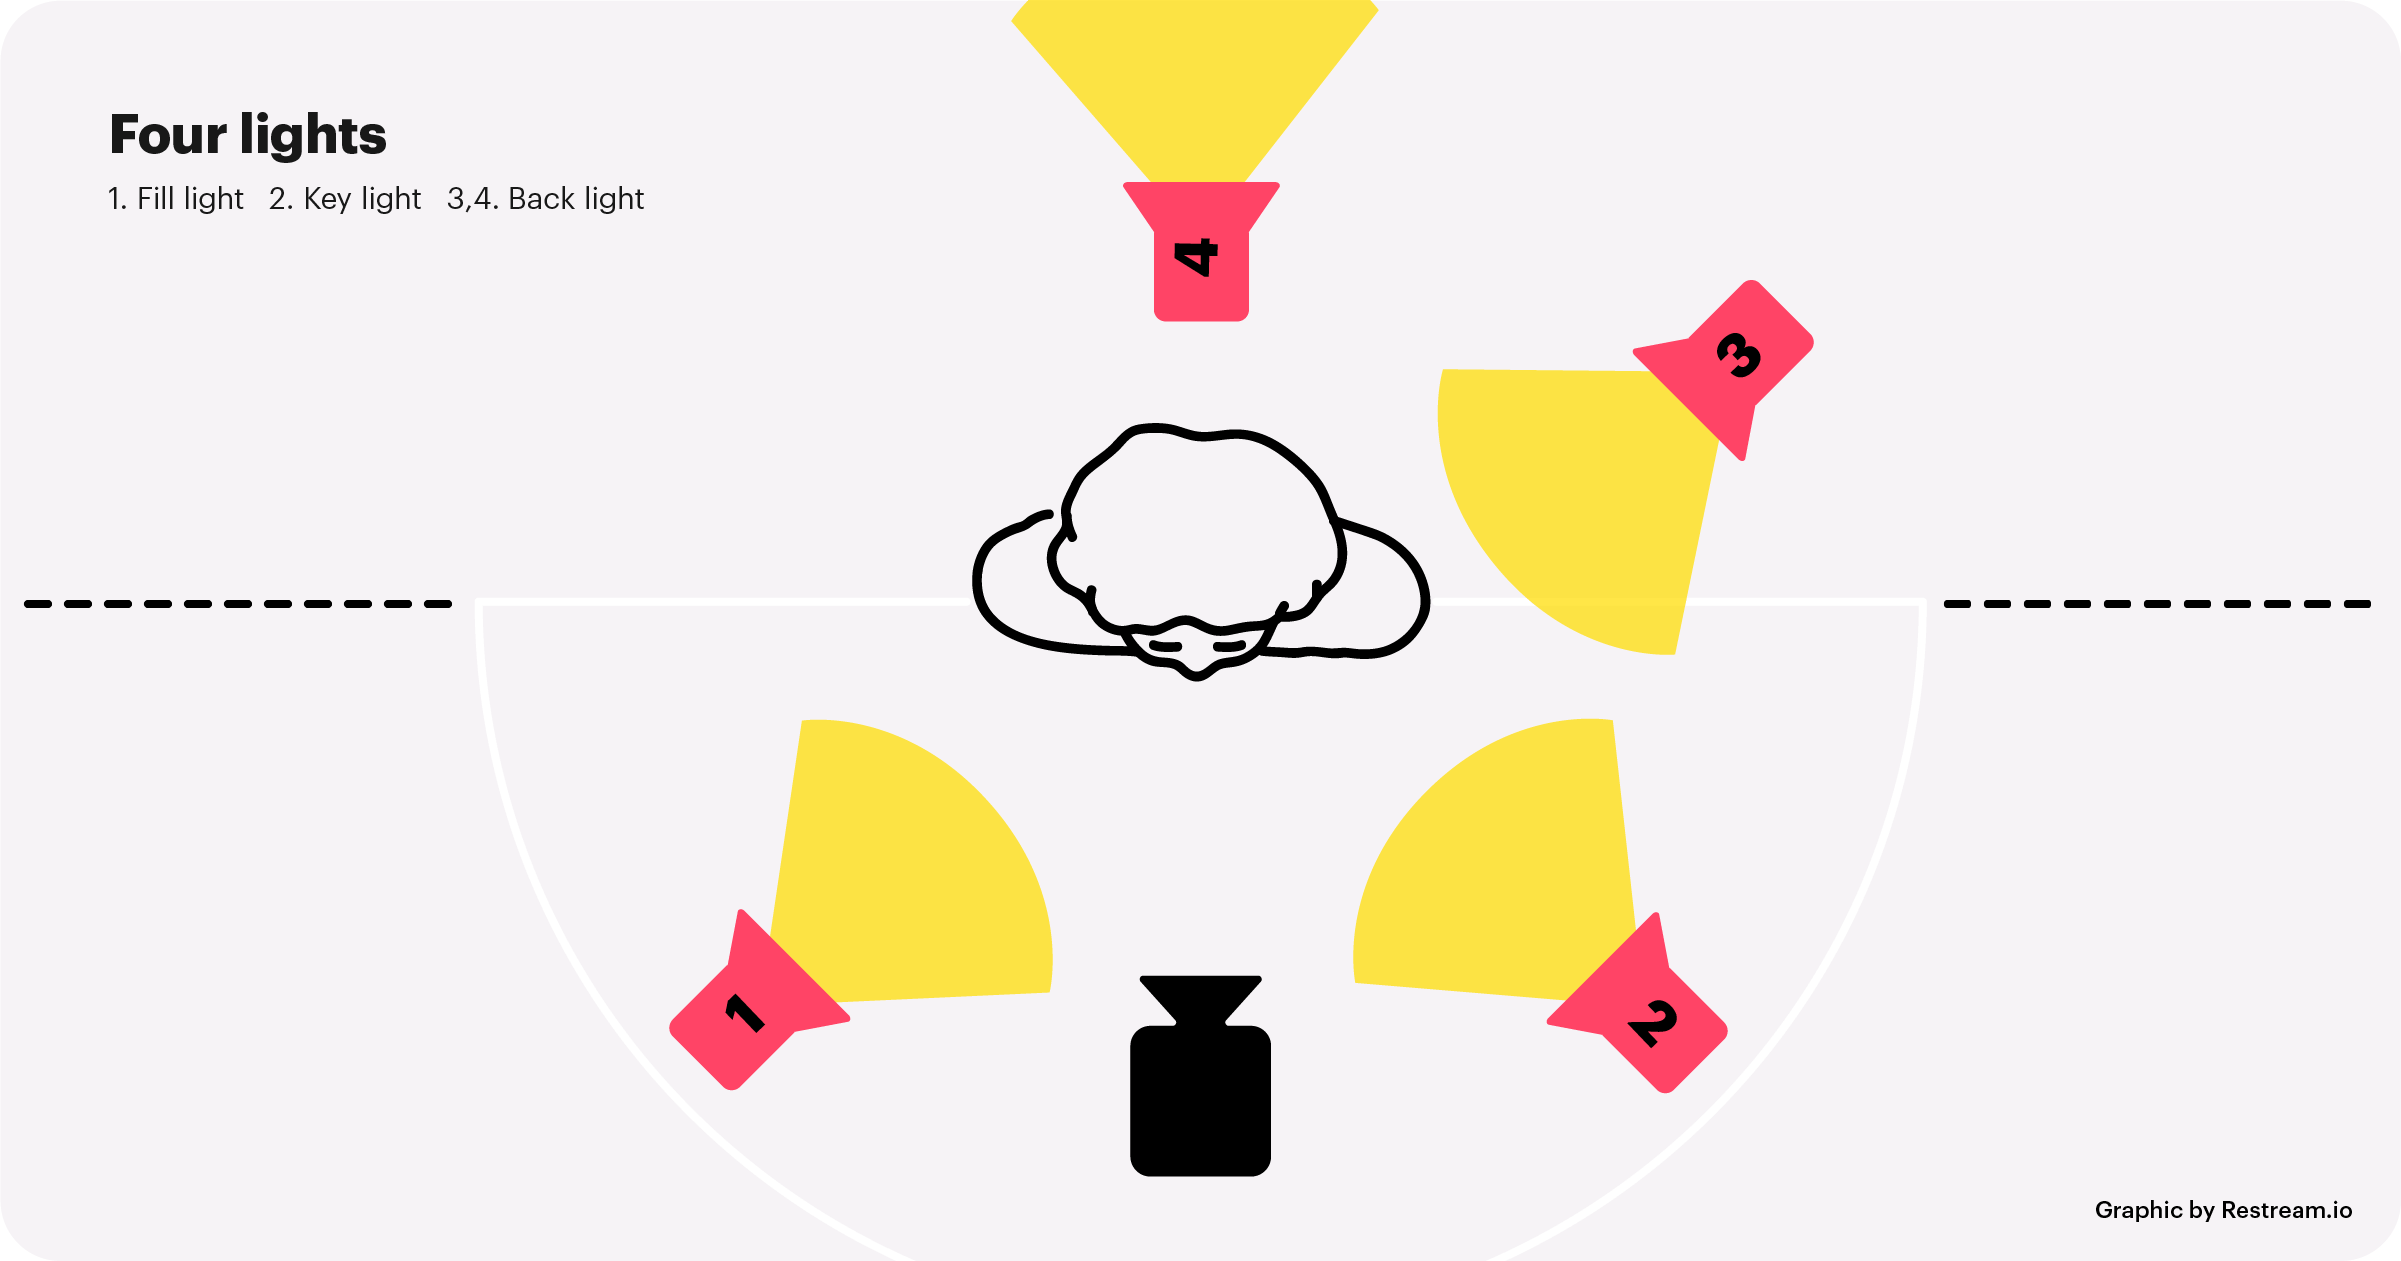
Expanding on your three-point setup, you can add a background light. This light stands about waist-high, right behind the subject, and illuminates your background. Not every background needs a light on it, but this lighting setup brightens the wall behind the subject and gets rid of extra shadows.
Loop lighting
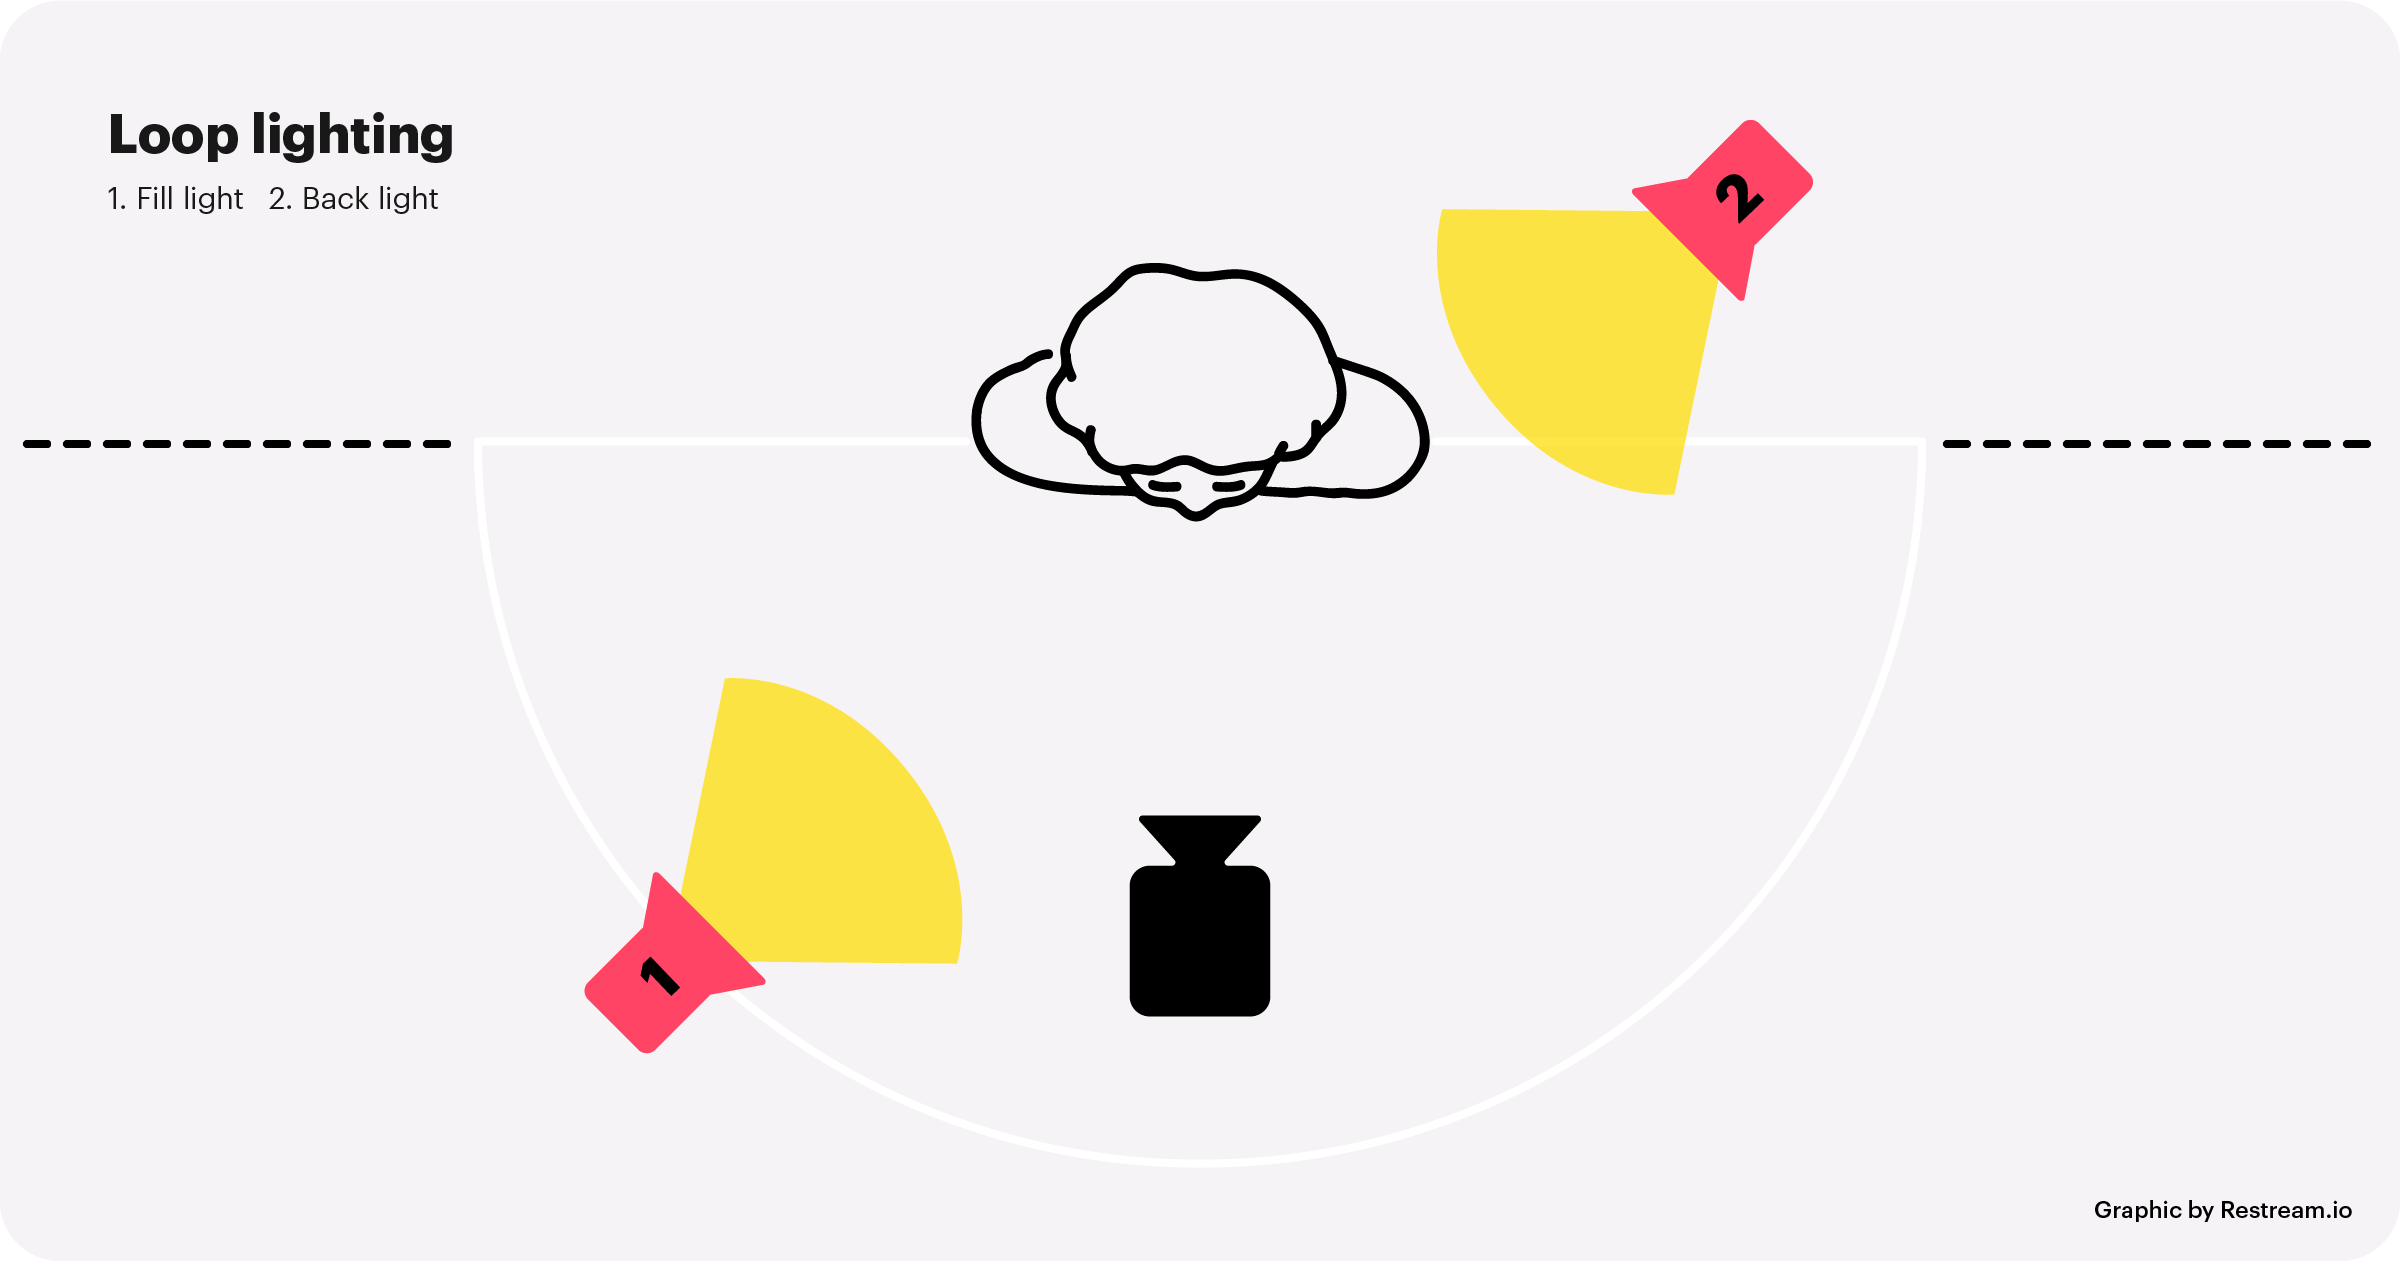
You can do loop lighting if you have one key light and one fill light. Place the key light on one side of the camera, slightly above eye level. The fill light goes on the other side to prevent shadows. Loop lighting is good for professional videos.
One light
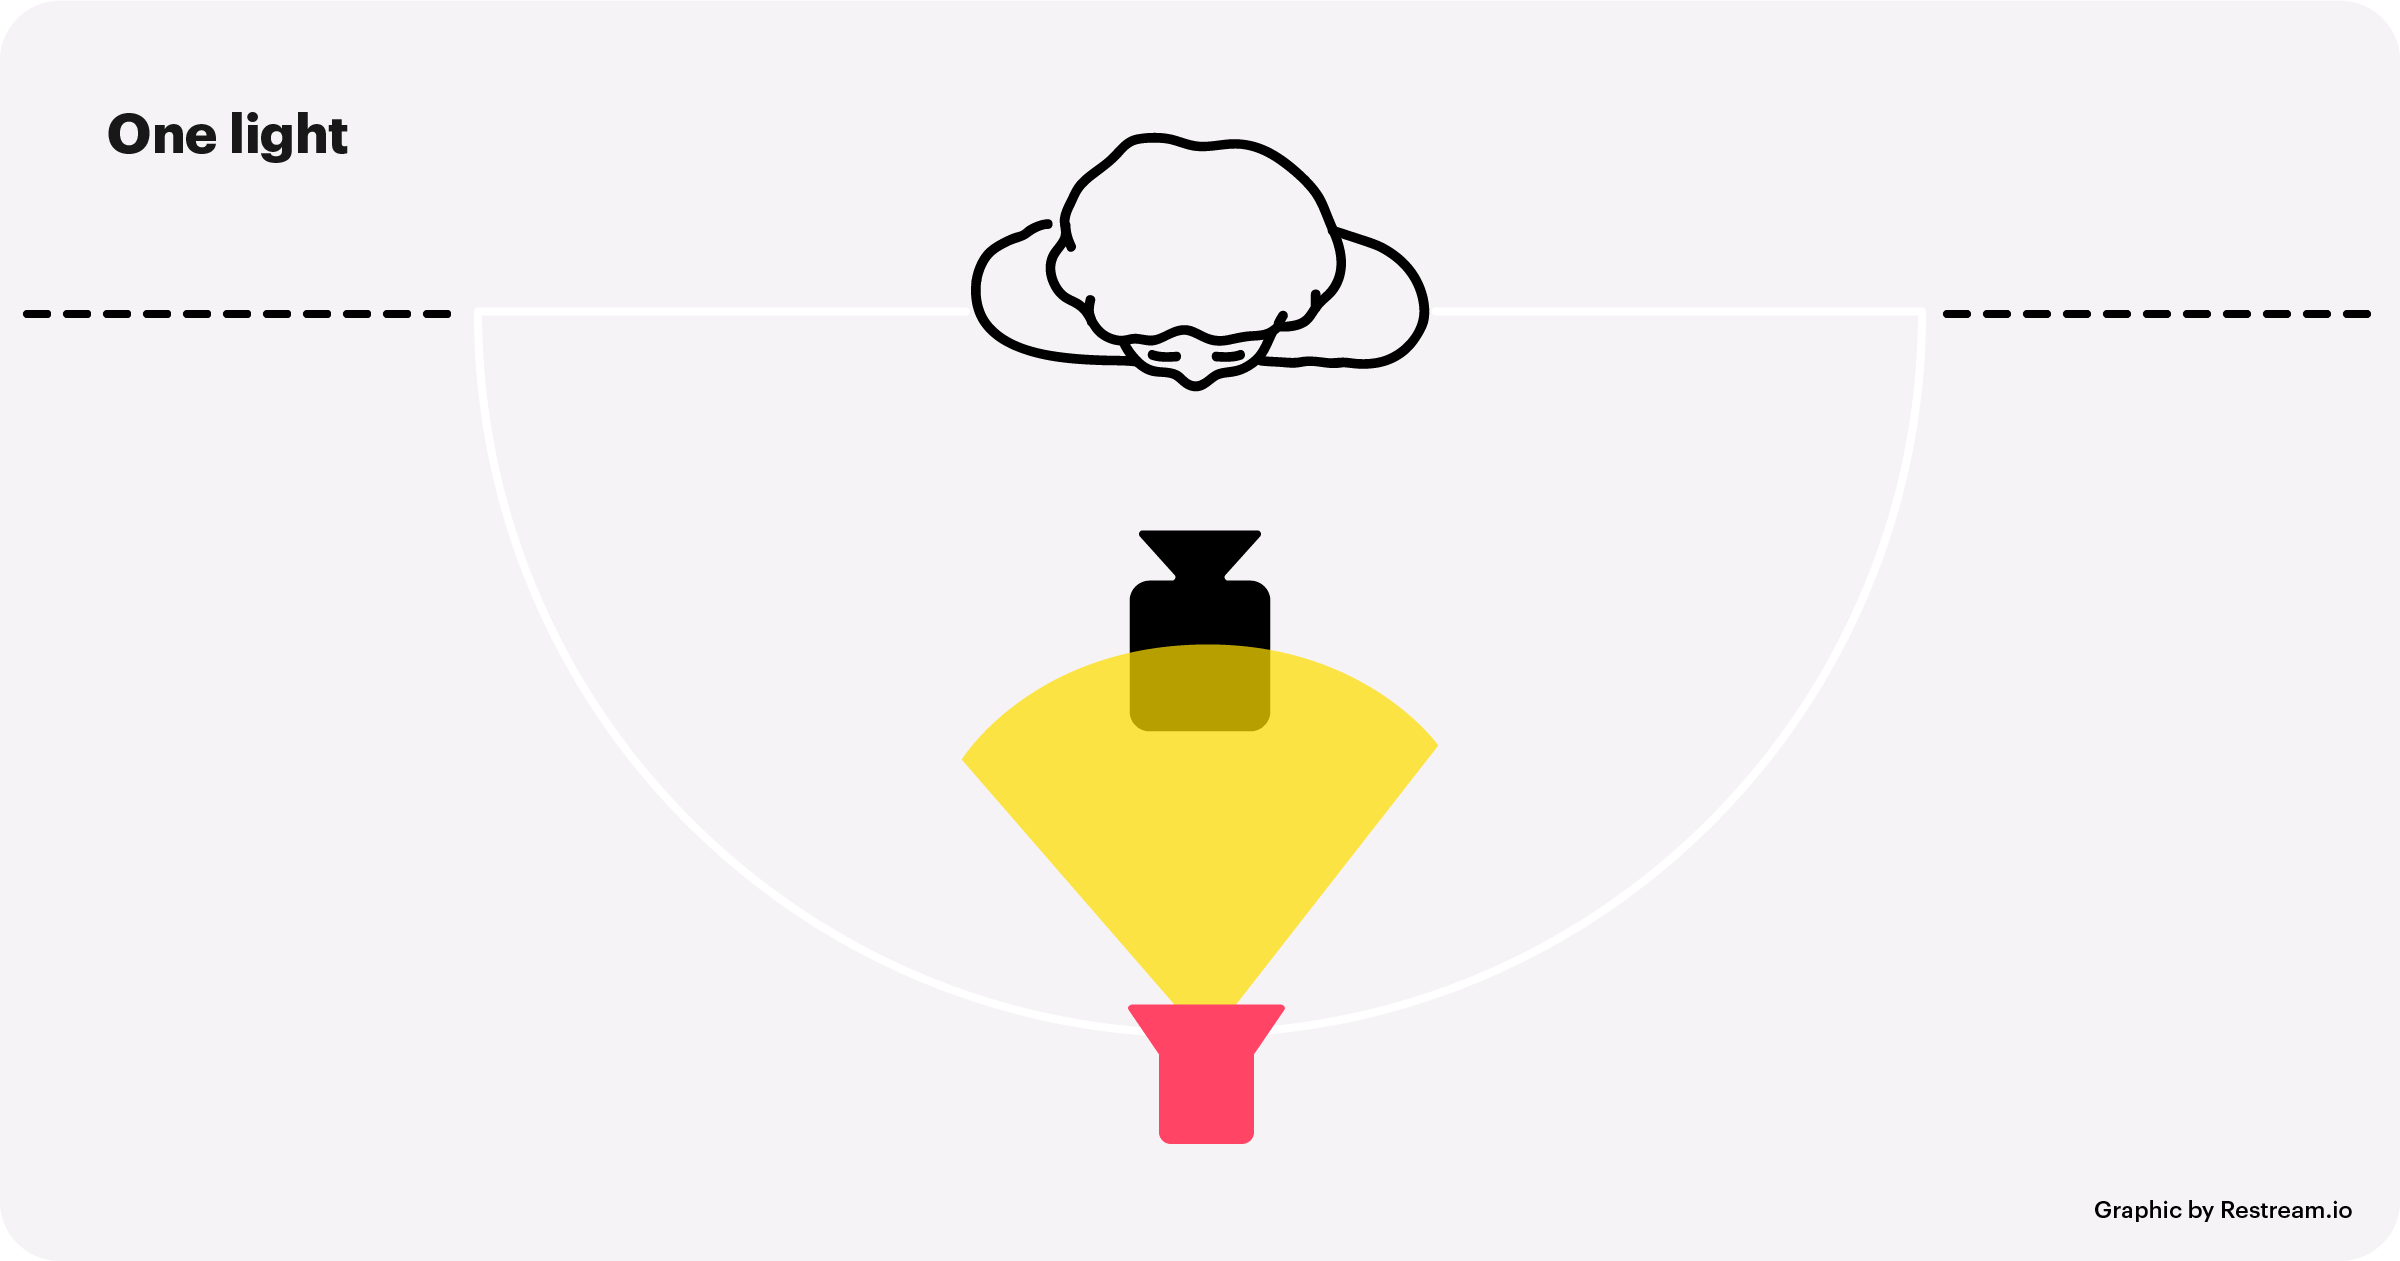
As mentioned before, if you want to use only one light, your best option for a YouTube video or live stream is a ring light, placed directly behind the camera.
Natural light
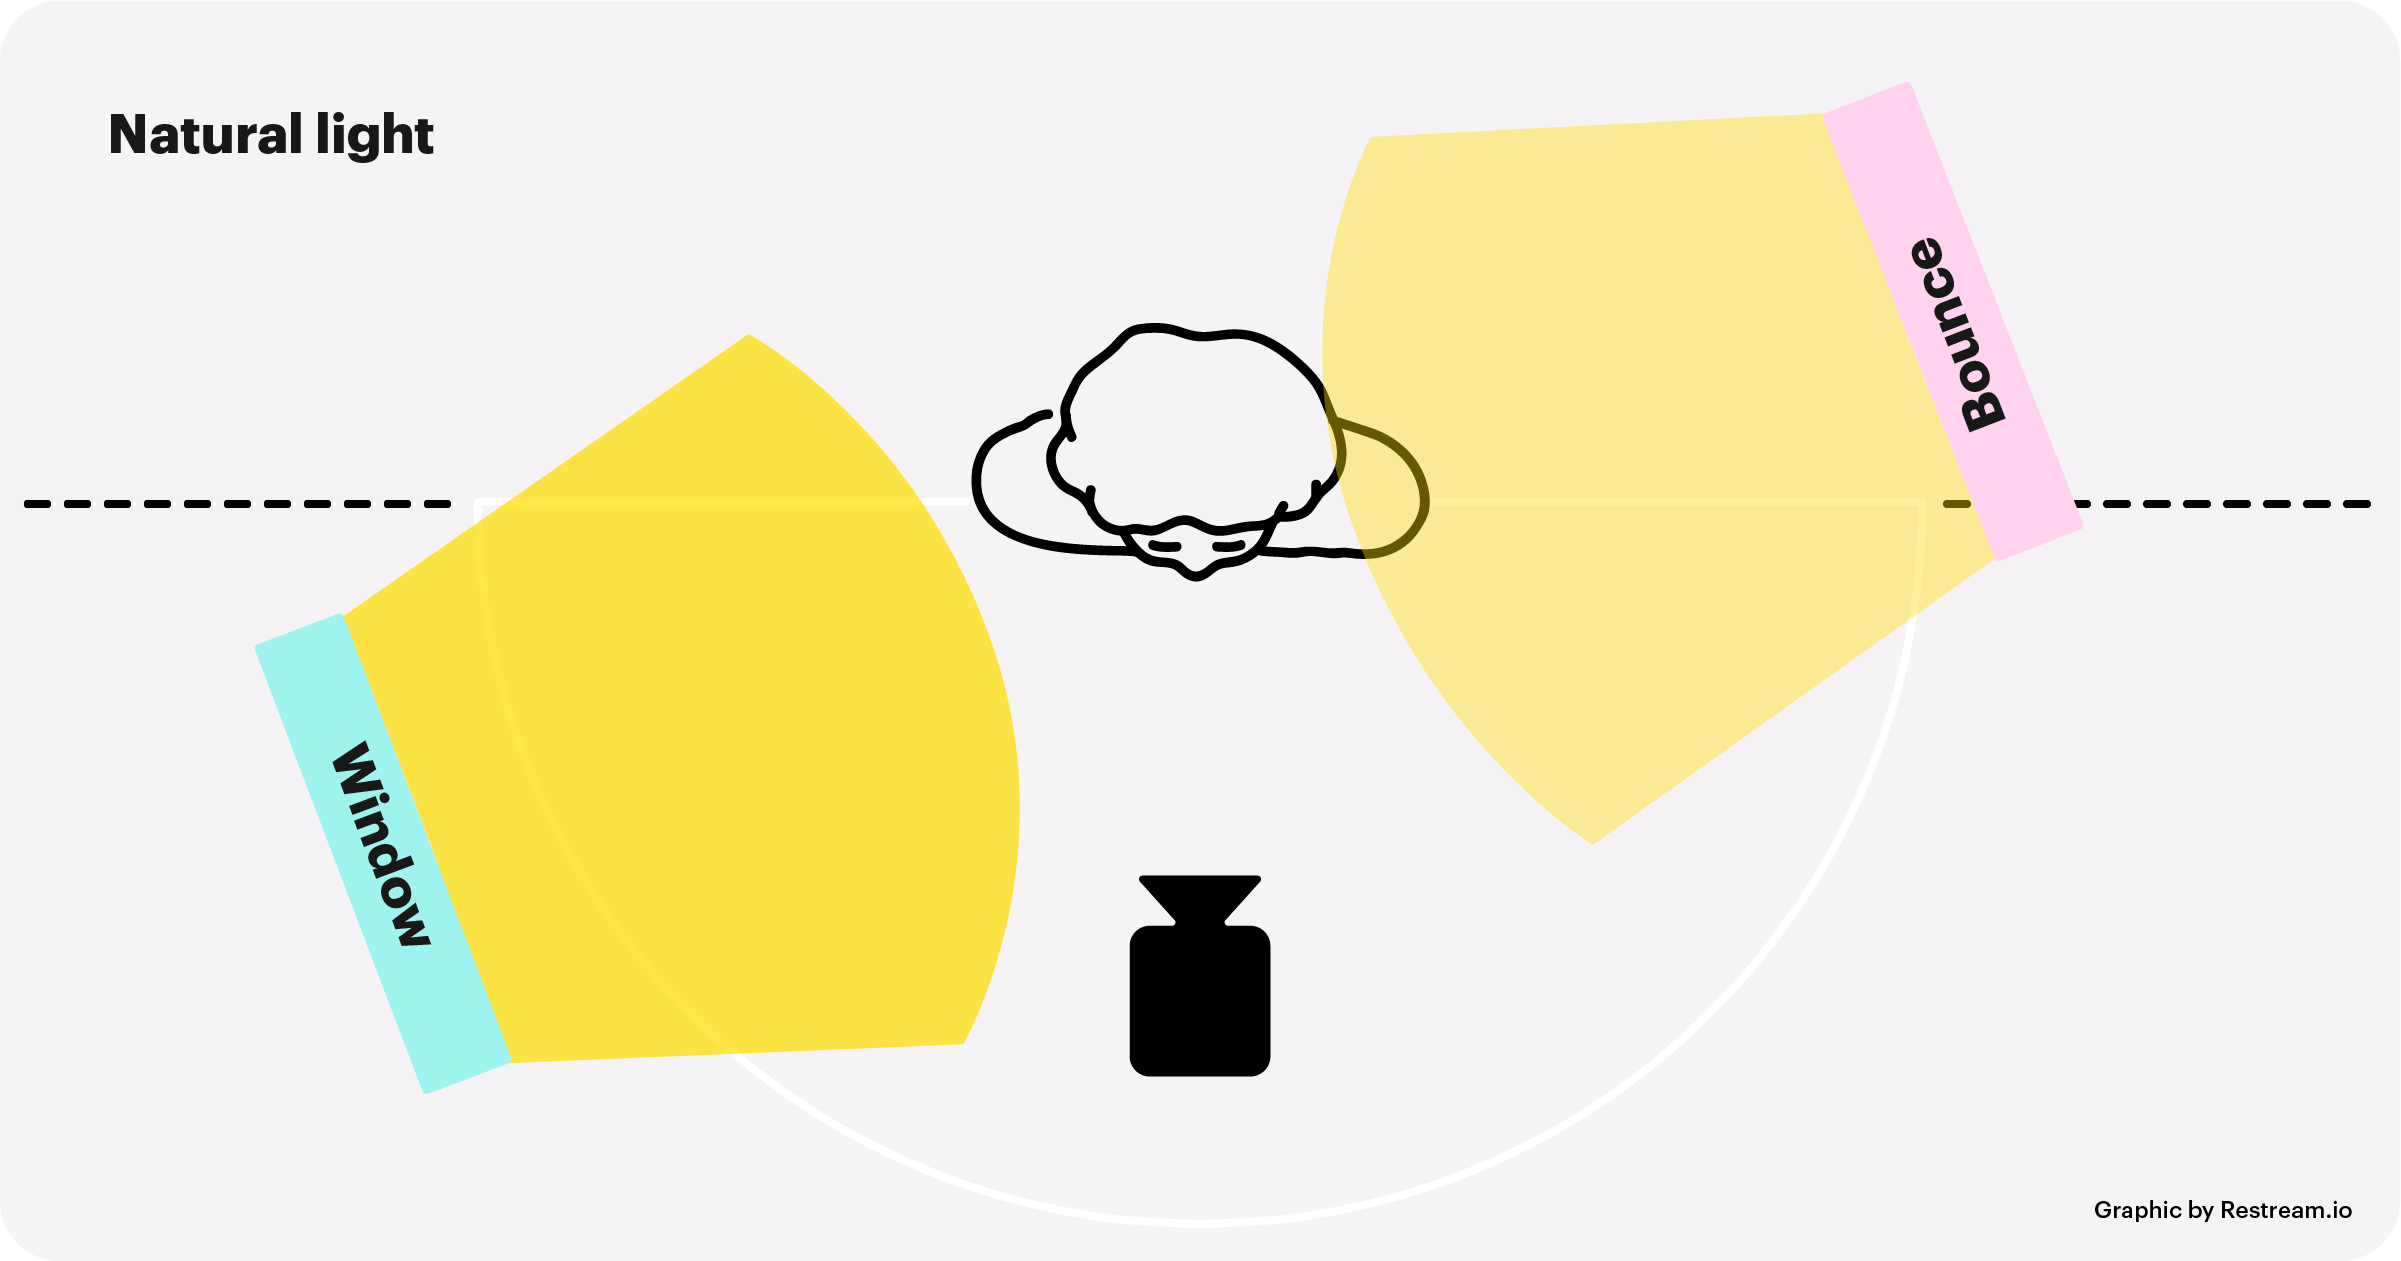
If you can make it work for you, natural lighting is always the best. It’s also the least expensive. When you film near a window, stand in front of it, with your camera in between. It’s much better to have the light shining on you from this angle than to have the light shining on your back. You can also make the most of window lighting by positioning yourself so the window is on your side, then place a reflector on your other side — natural loop lighting!
How to get the best outdoor lighting
Filming outdoors poses different challenges from shooting inside. Natural light is great but uncontrollable. Direct sunlight can also be much harsher than artificial light, depending on the time of day. If you’re filming outdoors, use these tricks to make the lighting work for you.
ND filters

ND (neutral density) filters fit over your camera lens and help darken the image. An ND filter lets you turn down the brightness without messing up your exposure. Some cameras come with ND filters, but others don’t. You can purchase one separately or go for the more cost-effective option of using reflectors.
Reflectors

Too much sunlight isn’t good for filming video. Sunlight in front of you makes too many shadows, while sunlight behind you washes you out. Use a tool such as a five-in-one reflector to better control lighting outside. This type of reflector comes in five colors:
- White
- Black
- Gold
- Silver
- Transparent
If you’re shooting outdoors by yourself, you’ll also need to purchase a stand for your reflector.
When trying to control natural light, look for natural ways to diffuse it. Standing under a shady tree at high noon is an example of natural light diffusion. Aim for early morning or late afternoon if you’re shooting outside, as these times of day tend to cast the fewest shadows and have the softest light.
The best lighting for every budget
Video lighting equipment comes in all shapes, sizes, and price points. Whether you’re just starting out and not willing to spend a lot on lighting yet or you’re a pro looking for an upgrade, there are lighting tools for every budget.
Economic
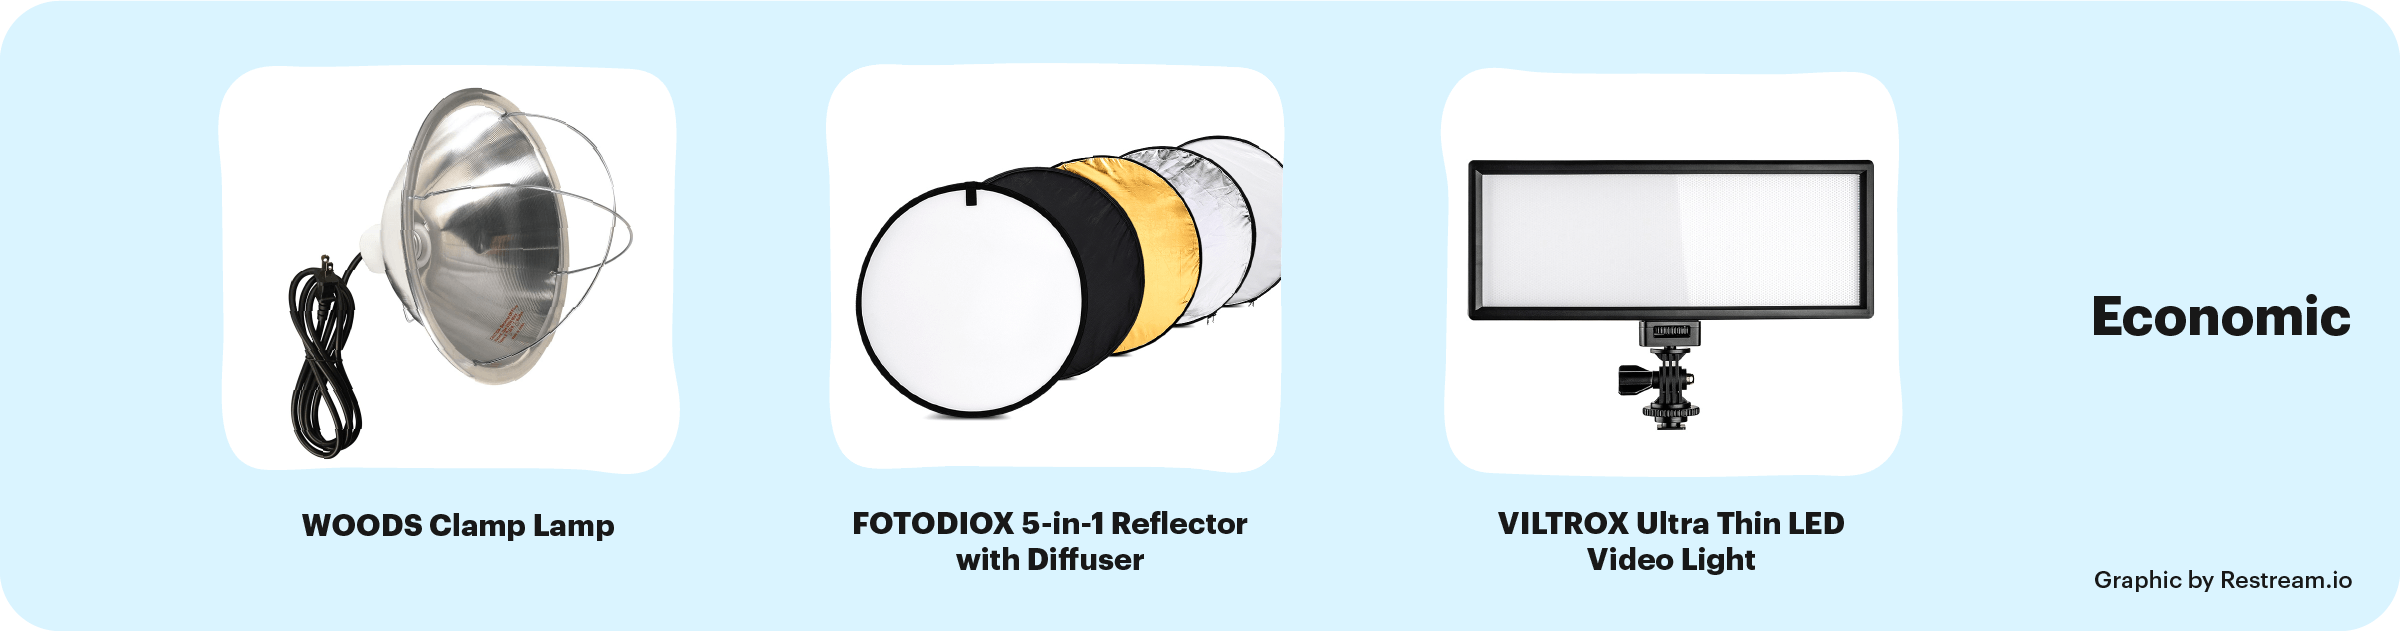
- Woods Clamp Lamp — inexpensive, versatile, but can be harsh without diffusers
- Fotodiox 5-in-1 Reflector with Diffuser — for difficult outdoor shots
- VILTROX Ultra Thin LED Video Light — LED key light
Mid-range

- Neewer Video Lighting Kit — lighting kit including ring light
- Emart 600W Umbrella Set — umbrella lighting kit
- YONGNUO YN300 Air Pro LED Light — key lights that don’t need diffusers
- Godox SL-60 LED Light — fill light
- Elgato Key Light Air — tabletop key light for gamers
Top-tier
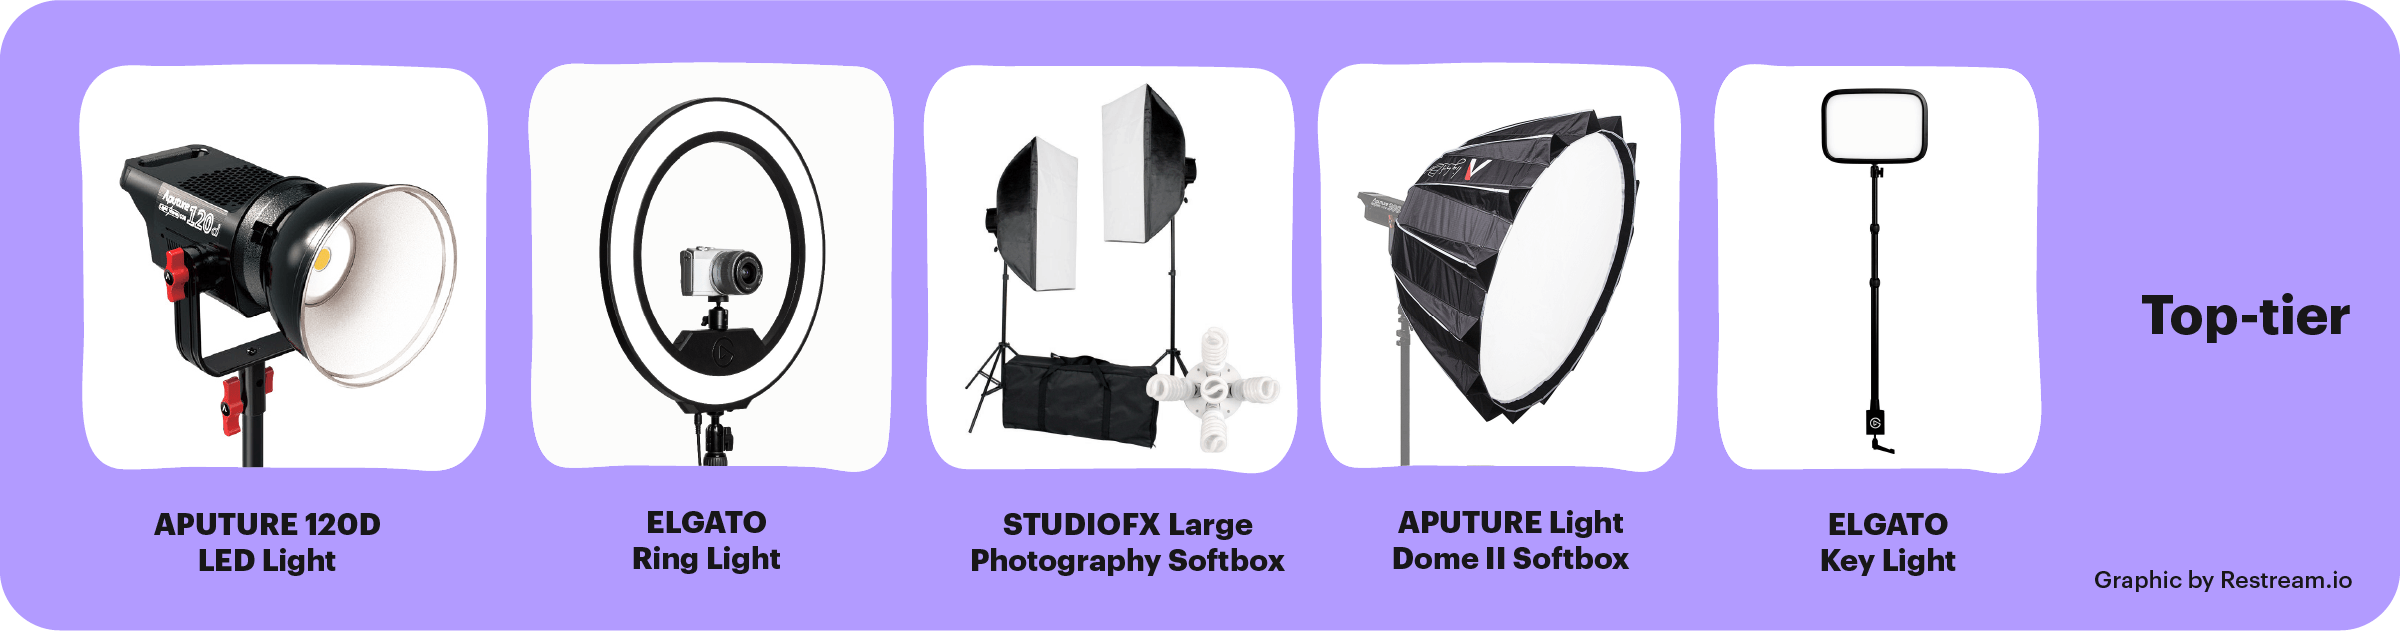
- Aputure 120D II LED Light — LED fill light
- Elgato Ring Light — mountable ring light with desk clamp
- StudioFX Large Photography Softbox Continuous Photo Lighting Kit — pro lighting kit
- Aputure Light Dome II Softbox — softbox diffuser
- Elgato Key Light LED Panel — panel key light
Tips and Tricks — live streaming and video lighting
1. Webcam lighting
If you’re shooting a video with a webcam, your face is the center of attention. Make sure it’s lit evenly, with minimal shadows. Use either natural lighting from a window (position your webcam in front of the window, with you facing the window) or go with an inexpensive ring light.
2. Filming outside
When shooting your video outside in the daytime, find shade. Direct sun overhead will leave you overexposed. If it’s nighttime, find a street lamp to film near. Don’t stand directly beneath the lamp, as that will make creepy shadows on your face. Instead, stand just to the side of the street light. It’s not perfect, but it’s the best quality you’ll get filming outside in the dark.
3. Don’t mix video lighting
Mixed lighting refers to color temperatures — when a warm light and cooler light are both shining onto your set. These differing temperatures make your camera sensor work harder and your video will either be too yellow or too blue.
4. Go easy on the back light
For a live stream or video where you’re talking directly into the camera, avoid too much back light. It casts a dramatic shadow that’s great for cinematic films but a bit too much for live streams. If you choose to use a backlight, balance it with key and fill lights.
5. Replace LEDs with fluorescent bulbs for softer light
There are many ways to soften light, and we’ve mentioned a few suggestions already. Another option is swapping out LED bulbs for fluorescent ones.
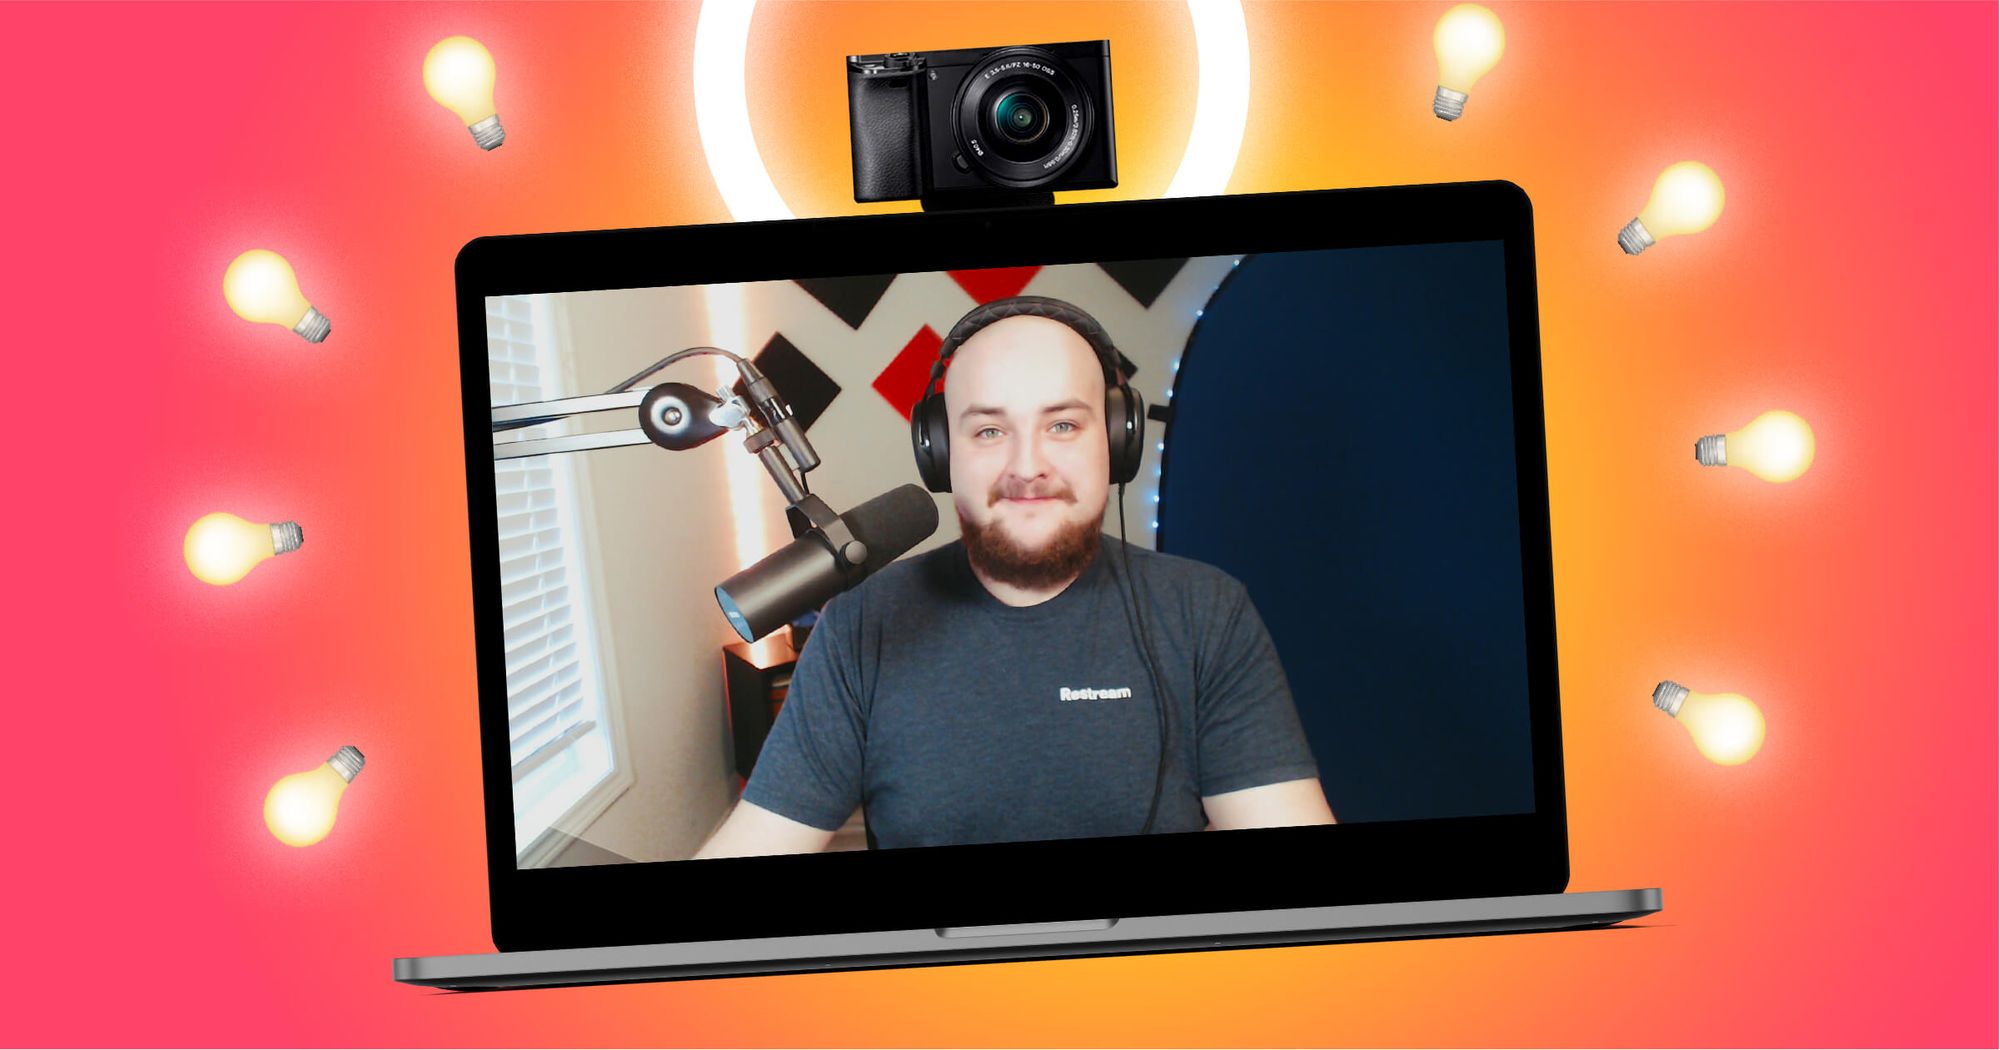
6. Record professional videos and live streams from a desktop
With the right lighting setup, you can record high-quality videos and live stream any type of content. With Restream Studio, you can go live across multiple channels simultaneously, add graphics and overlays, and centralize chat features from your audience — all from your browser. The Studio is great for all content types that need good lighting, such as Q&As, interviews, and product launches.
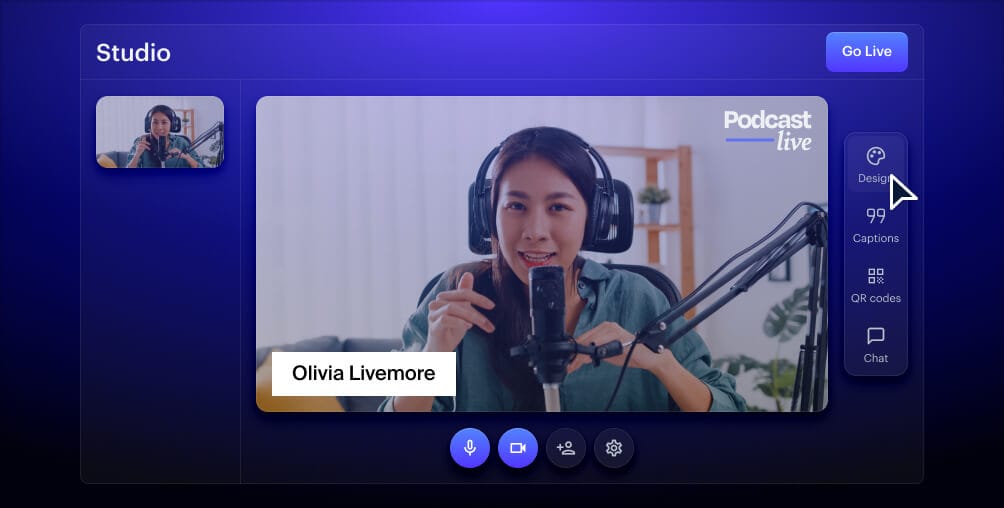
Create stunning live videos
Restream Studio is the easiest way to create high-quality live videos on multiple platforms at once. It's user-friendly and offers an engaging viewer experience.
Final thoughts
Lighting is not a small detail for videos and live streams. Your lighting scheme can be the difference between a high-quality stream that engages your audience and an unprofessional video that distracts your viewers. Give some thought to your setup and experiment with different styles. If you’re just starting out as a live streamer, don’t overlook your lighting.